
Overview – Web Form Filling Using MuleSoft RPA (Part 2)
We’re all here reading this post because we know that MuleSoft RPA is a great tool for the automation of basic Web tasks, such as filling out forms. This example shows how Salesforce can provide data to a MuleSoft RPA process to fill in a Web form, and Salesforce gets updated with output data from the RPA process. Salesforce and MuleSoft RPA work together effortlessly for a smoothly integrated automation experience.
Prerequisites for Web Form Filling Using MuleSoft RPA
The following pre-requisites are needed for this example:
- Licenses for Salesforce and MuleSoft RPA
- Anypoint Platform credentials
- Salesforce credentials
- A MuleSoft RPA process in Production phase with an invokable run configuration*
- URL of this invokable RPA
- Client ID and Client Secret for Connected App with “RPA Invocable Process” scope
*For assistance with any part of this pre-requisite, please see Part 1 of this blog post and/or Cloud First Labs’ prior blog posts on invoking a MuleSoft RPA process via Postman:
Invoke a MuleSoft RPA Process via HTTP and Postman – Part 1
Invoke a MuleSoft RPA Process via HTTP and Postman – Part 2
Salesforce – Set up MuleSoft Services
MuleSoft Services must be set up for Salesforce to properly connect to the MuleSoft RPA process. To handle this, log in to Salesforce and go to Setup -> MuleSoft -> Services:
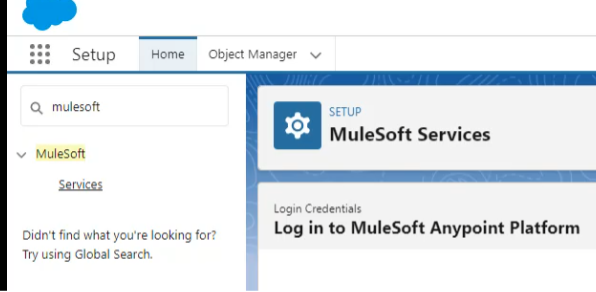
Log in, using Anypoint Platform credentials, to MuleSoft Anypoint Platform and grant access. Under the covers, this creates an external credential, a named credential, and an auth provider in Salesforce, all named “MuleSoft Anypoint Platform US”. This also automatically creates a “MuleSoft Anypoint Platform” permission set. This example will require setting up a separate external credential, named credential, and permission set, as shown in the steps below.
Salesforce – Create External Credential
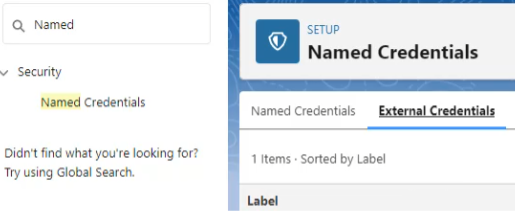
Go to Setup -> Security -> Named Credentials. From there, go to the External Credentials tab. Click New:
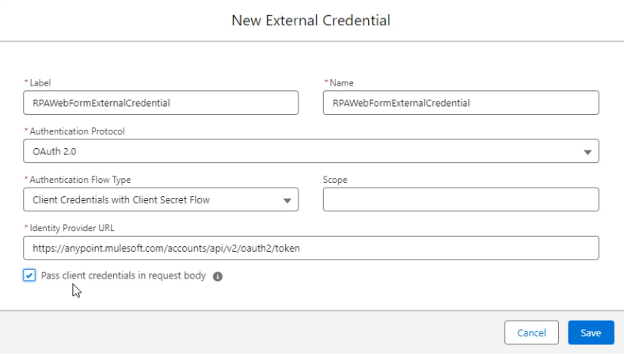
In the New External Credential window, provide a Label and Name for this External Credential (e.g. “RPAWebFormExternalCredential”) and select OAuth 2.0 as the Authentication Protocol. Authentication Flow Type gets set to Client Credentials with Client Secret Flow, and Identity Provider URL gets set to the OAuth2 token URL used by the RPA process (e.g. https://anypoint.mulesoft.com/accounts/api/v2/oauth2/token). Click Save:
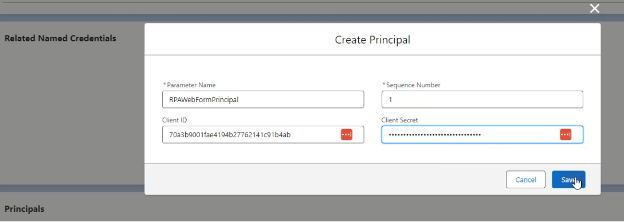
Next, a Principal needs to be created within this External Credential. From the main screen for the External Credential, scroll down to the Principals section and click New.
Fill in a name for the Principal and then enter the Client ID and Client Secret for the related Connected App (mentioned in the Prerequisites section above). This provides the External Credential with the actual credentials it needs to invoke the RPA process. Click Save:
Salesforce – Create Named Credential
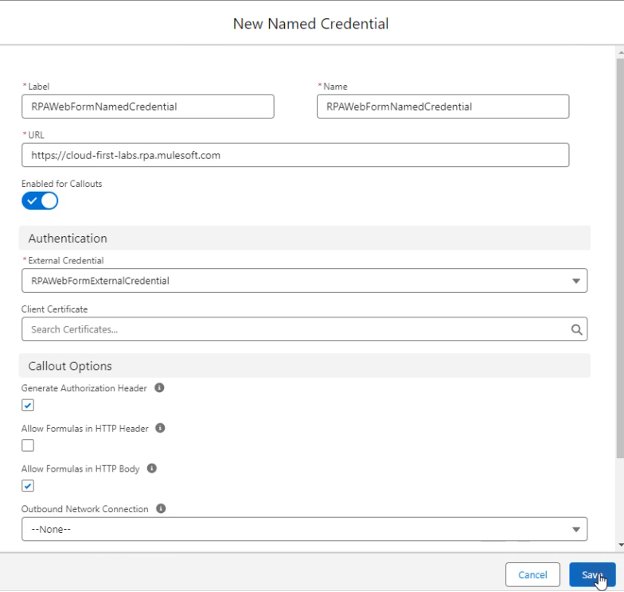
With the External Credential in place, it now must be associated with a Named Credential. Go to Setup -> Security -> Named Credentials. Go to the Named Credentials tab and click New.
On this screen, enter a label and name, and then for the URL field, use the base URL for the relevant organization’s RPA processes. (For example, the Cloud First Labs’ RPA URL is https://cloud-first-labs.rpa.mulesoft.com). Ensure that the Enabled for Callouts is checked. For External Credential, select the External Credential created in the “Salesforce – Create External Credential” section above. Ensure that Allow Formulas in HTTP Body is checked and click Save:
Salesforce – Create Permission Set
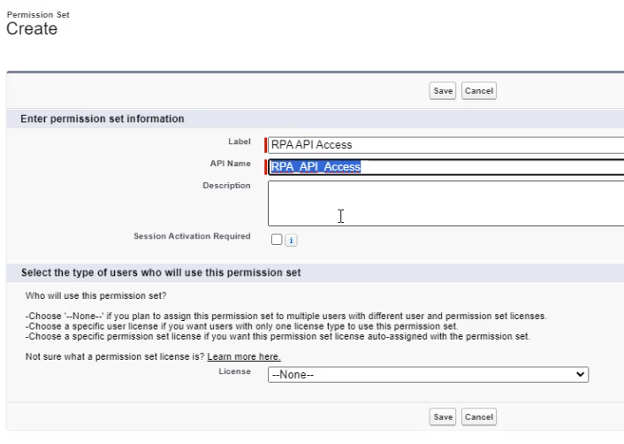
Next, create a Permission Set by going to Setup -> Services -> Permission Sets -> New. For this exercise, name the Permission Set “RPA API Access”. Click Save:
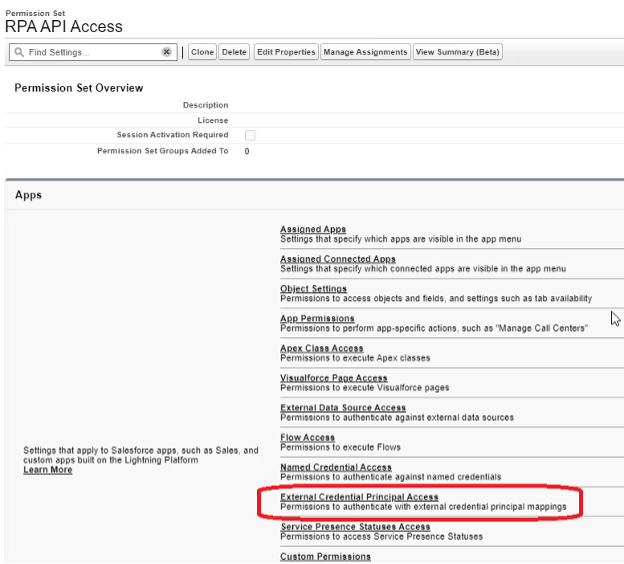
Within that permission set’s page, go to the Apps section and click External Credential Principal Access:
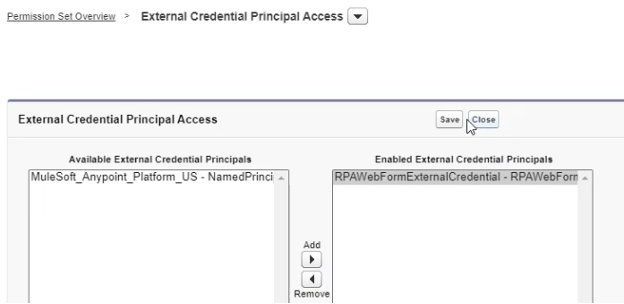
Within this, go to Edit. Then add the RPA External Credential Principals:
Then click Manage Assignments and assign that permission set to someone with lots of access (such as a System Administrator). In my case, I assigned the permission set to my user (“Joe Kalb”) who is a System Administrator.
Salesforce – Create External Service for RPA Invocation
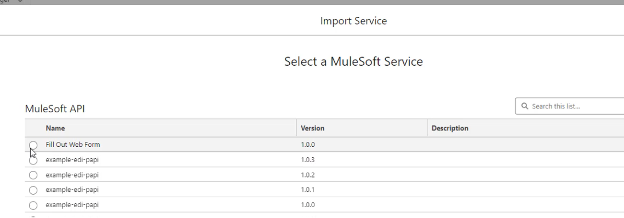
Next, an External Service must be created to invoke the RPA process. Go to Setup -> MuleSoft -> Services. Make sure the system is still logged in to Anypoint Platform. Then click Import. In the Import Service screen, find the name of the relevant RPA process (e.g. “Fill Out Web Form”):
Click Next, give a name, and then reference the previously created Named Credential and click Next:

The next page is “Select Operations to Import”. Here, select 2 operations: “startProcessV2” and “getProcessesExecutionStatusV2”:
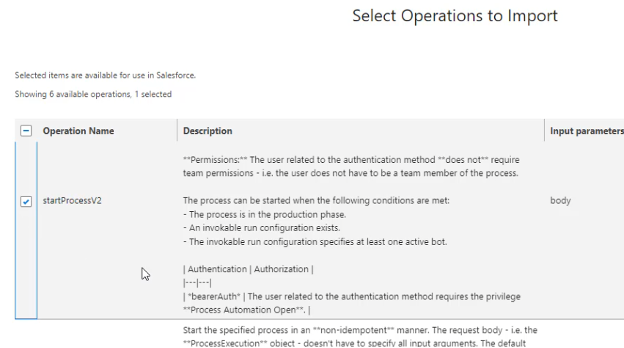
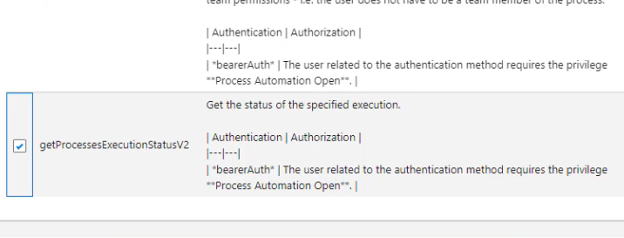
The startProcessV2 operation is used to kick off the process and the getProcessesExecutionStatusV2 is used to get the details of the kicked-off process (e.g. get the process success/failure status and the values of the RPA’s activity parameters).
Click Finish.
With this in place, this service can be referenced as an External Service from a Salesforce Flow:
Salesforce – Create Flow to Kick off the RPA Process
Create a Flow
Go to Setup -> Process Automation -> Flows -> and click “New Flow”:
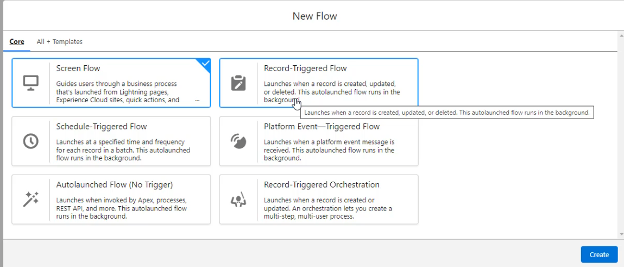
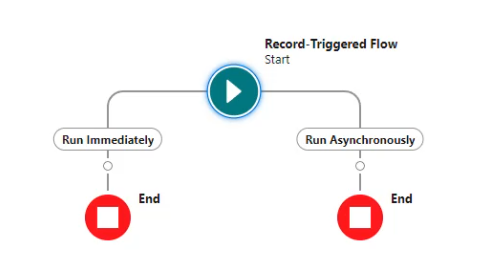
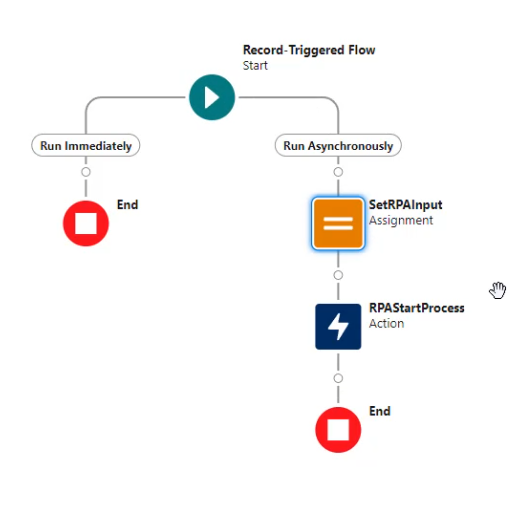
This example will execute when a Quote object gets its Status changed to Presented. For this reason, this example will be a Record-Triggered Flow, with two branches.
The first will be a “Run Asynchronously” path which will be kicked off immediately upon the record update, and it will do an external callout to invoke the RPA process using data from the triggering Salesforce object. (Note: the path must be a “Run Asynchronously” path instead of a “Run Immediately” path because external callouts cannot run from within a “Run Immediately” path in a Salesforce flow.) The second will run 2 minutes later to check on the status and details of the triggered RPA process execution, and it will update the Salesforce object with that RPA output data.
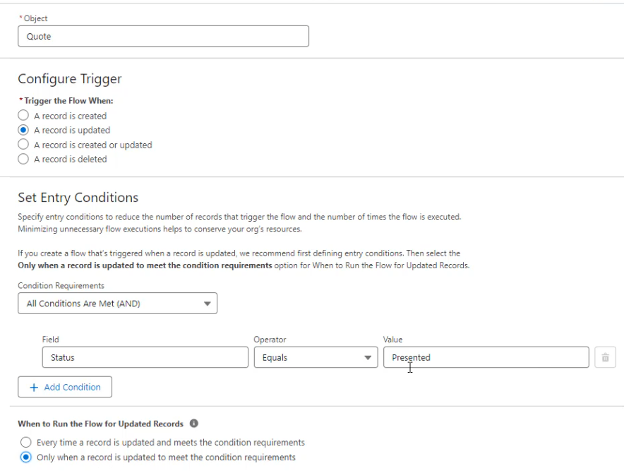
The example case kicks off the RPA process whenever a Quote object enters Presented status, so the flow configuration is set up as follows.
Trigger the Flow When: A record is updated
Condition Requirements = All Conditions Are Met (AND)
The Condition is: Status Equals Presented
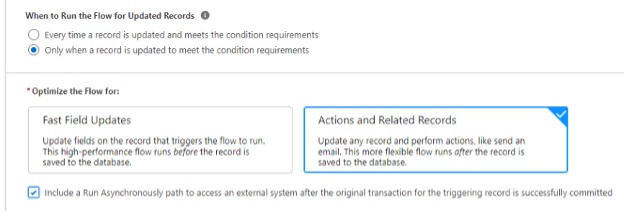
When to run the Flow for Updated Records = Only when a record is updated to meet the condition requirements
Optimize the Flow for = Actions and Related Records
Check the “Include a Run Asynchronously path to access an external system after the original transaction for the triggering record is successfully committed” box:
With this configured, click Save and name the Flow (e.g. “RPA Web Form Flow”:
Implement “Run Asynchronously” Path
Add a New Resource for RPA Invocation HTTP Request Body
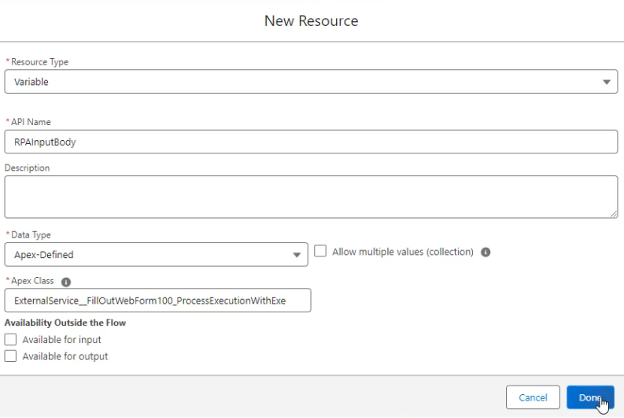
This flow path will be used to invoke the RPA process, and the invocation will happen via HTTP call. The flow will set the HTTP request payload for that invocation (using data from the triggering object). For this purpose, a new variable is created.
Expand the Toolbox and click New Resource. Resource Type = Variable. Set API Name = RPAInputBody. For Data Type, select Apex-Defined. In Apex Class, search for the name of the External Service created earlier (e.g. “FillOutWebForm100”) because that is how the auto-generated Apex classes are named. Find the class ending in “ProcessExecutionWithExecutionID”. This is what holds the input payload to the RPA process (e.g. “ExternalService__FillOutWebForm100_ProcessExecutionWithExecutionID”):

Add Assignment Element to Populate RPA Input Body
The RPAInputBody variable was created in the last step but not initialized with a value. To assign it a value, add a new step to the “Run Asynchronously” path. This step will be an Assignment. Set the Label = ‘SetRPAInput’ and then go down to the Set Variable Values section.
Set the RPAInputBody > executionId Equal to a relevant value that will serve as the unique identifier of the RPA process (e.g. $Record > Quote Number). This will be used later to check on the status of the executed RPA process.
The inputArguments will differ based on what the activity parameters are within the specific RPA process being invoked. In this instance, these values get set approximately as follows.
| Variable | Operator | Value |
| RPAInputBody > executionId | Equals | {!$Record.QuoteNumber} |
| RPAInputBody > inputArguments > inputName | Equals | {!$Record.Opportunity.Account.Name} |
| RPAInputBody > inputArguments > inputAddress | Equals | {!$Record.Opportunity.Account.BillingStreet}, {!$Record.Opportunity.Account.BillingCity}, {!$Record.Opportunity.Account.BillingState} {!$Record.Opportunity.Account.BillingPostalCode} |
| RPAInputBody > inputArguments > inputEmail | Equals | {!$Record.Opportunity.Account.Owner.Email} |
| RPAInputBody > inputArguments > inputPhoneNumber | Equals | {!$Record.Opportunity.Account.Owner.Phone} |
| RPAInputBody > inputArguments > inputComments | Equals | {!Record.Description} |
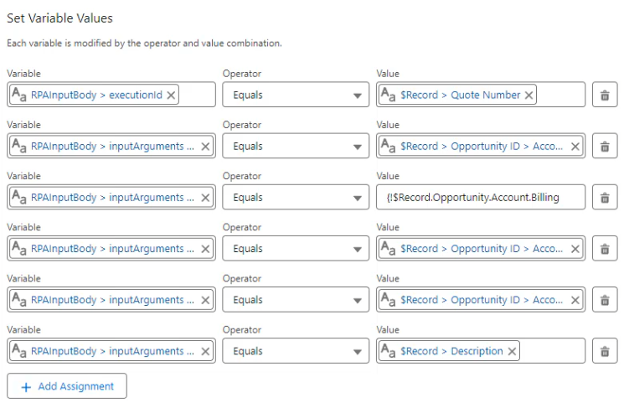
The above values are what will be passed into the MuleSoft RPA process. Once this is set up, the RPA process can be invoked.
Add Action Element to Invoke RPA Process
Add a new Action Element to the “Run Asynchronously” path. Search for the name of the External Service (e.g. “FillOutWebForm100”). Select the “Start Process V 2”) Action. Give it a Label and API Name (e.g. “RPAStartProcess”). Include a Body, and in the Body section, use the RPAInputBody created in the steps above. Click Done:
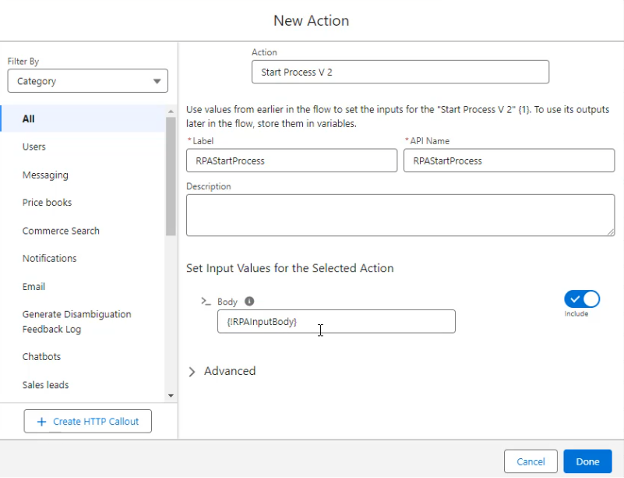
This completes the “Run Asynchronously” path.
Next, another path will be added to check the status of the executed RPA process instance and to update the triggering Salesforce object accordingly.
Implement “Two Minutes Later” Path
Add the “Two Minutes Later” Path
Add a new path to the flow which will run 2 minutes after the initial update. Path Label = TwoMinutesLater, Time Source = “When Quote is Updated”, Offset Number = 2, Offset Options = “Minutes After”:
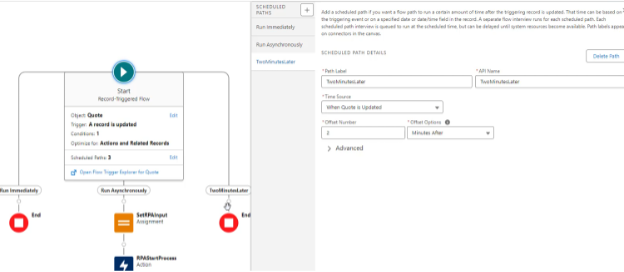
With this path set up, it is now time to add elements.
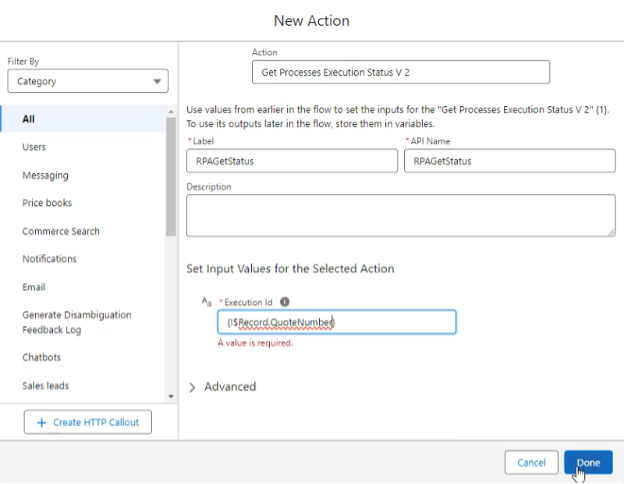
Add Action to Get RPA Process Execution Status
Add a new Action Element to the “TwoMinutesLater” path. Search for the name of the External Service (e.g. “FillOutWebForm100”). Select the “Get Processes Execution Status V 2”) Action. Give it a Label and API Name (e.g. “RPAGetStatus”). For the Execution Id, select the value used in the previous “Start Process V 2” action step for executionId (e.g. {!Record.QuoteNumber}). Click Done.
This step will check on the given RPA process execution instance and get its data back.
Add Action to Update Triggering Record
Finally, the Quote should get updated with a value from the RPA process which was executed in the “Run Asynchronously” path. The prior step gathered the data via a call to the “Get Processes Execution Status V 2” endpoint. For this example, the Quote’s Customer Notes field will get updated with the outputFormResponse activity parameter value from the RPA process.
Add an element for “Update Triggering Record”.
Add a Label (e.g. “Update Quote with RPA Output”) and API Name.
Set How to find Records to Update and Set Their Values = “Use the quote record that triggered the flow”
Set Condition Requirements to Update Record = “None—Always Update Record”
Set Field Values for the Quote Record. (Note: this example will be specific to the Cloud First Labs use case). This example set agilqt__customerNotes__c equal to {!RPAGetStatus.200.result.oneOfOutputArguments.outputFormResponse}.
Click Save. The Salesforce flow is set up and ready to test.
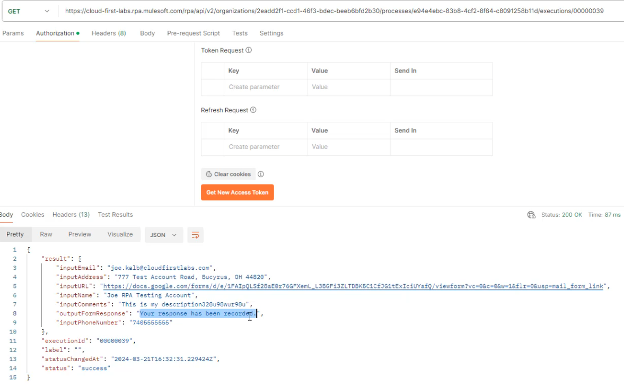
To test it out, create a Quote. Make sure the fields are set as needed to be input into the RPA process. Then move the Quote into Presented status to trigger the flow. After running, the output can be checked in Postman to verify that the RPA process was triggered:
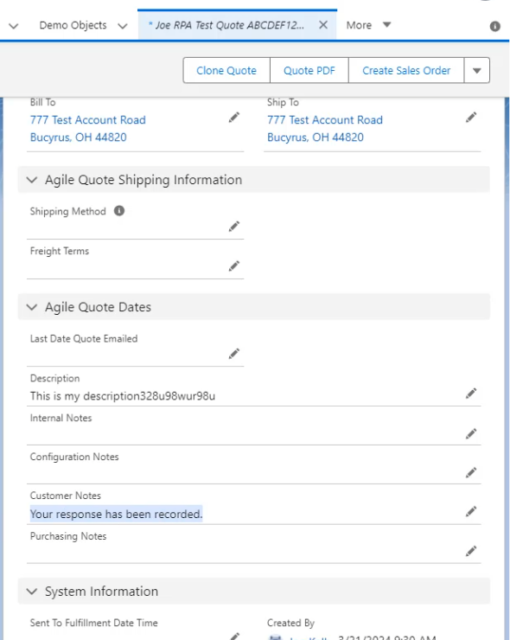
After the “TwoMinutesLater” path finishes, the Customer Notes should reflect the update provided back by the RPA process:
To see this in action, watch the video created to go along with this post:
Conclusion – Web Form Filling Using MuleSoft RPA
Yes, these two complementary posts were long but worth it! Repeating it is easier once you build one of these processes and successfully test it. Web Form Filling using MuleSoft RPA is just one of the many use cases where this technology really shines, and proves you don’t need an API-enabled application to use RPA.
Talk to the Professionals!
To learn more about our MuleSoft RPA, MuleSoft and EDI, or Salesforce services, please visit our website or fill out a Contact Us form here.