Overview
So why would you want to integrate with Gmail API using Mulesoft? Several use cases exist, ranging from processing a Gmail inbox for attachments to sending emails from a process outside of Salesforce. Since Gmail offers many APIs for handling email-related operations, and MuleSoft is positioned well to integrate with these APIs, there are many more possibilities, but this article will focus on sending an email with an attachment. There is abundant documentation about Gmail APIs available from Google but it is challenging to parse and get immediately-usable information from the documentation. Because of that, this post is here to fill in the gaps and show how to use MuleSoft to integrate successfully with Gmail APIs. As detailed in the sections below, some of the key steps for MuleSoft/Gmail integration are:
- Set up a Google Account
- Download Gmail Connector from Anypoint Exchange
- Set up the OAuth 2.0 Authorization Code flow in the Mule application
- Generate the proper payload
- Deploy the application with the correct settings
Follow along as I show you how to integrate with Gmail API using Mulesoft.
Set Up a Google Account
To utilize Gmail APIs, the first step is to set up the related Google accounts by logging in to a Google account and going to console.cloud.google.com.
Create Billing Account
To connect to the Gmail APIs, a project is required, and a billing account is required to create a project. From console.cloud.google.com, go to the hamburger menu -> Billing and click “Add Billing Account”. Follow the directions there to set up the account; of course, be careful with the setup of this project and how many requests use this billing account to avoid running up charges.
Create a New Project and Enable Gmail API
On the home page for console.cloud.google.com, click the dropdown menu at the top and when the screen pops up, click “New Project”. Give the project a name and use the billing account created in the previous step. Click Create.
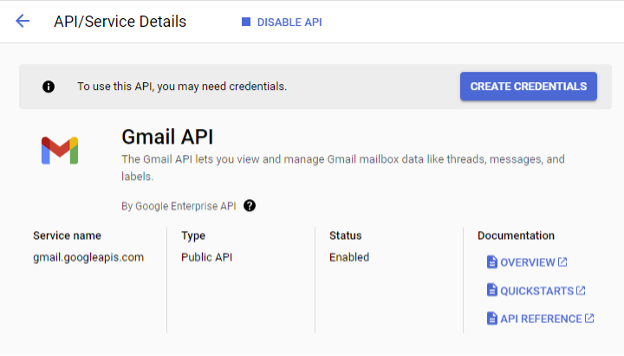
Within that project, click the hamburger menu -> APIs & Services. From this screen, click “Enable APIs and Services” and find Gmail API within the API library screen that pops up. Click on this Gmail API and click Enable to enable the Gmail API for this project.
Configure the Gmail API for this Project
With the Gmail API now enabled for this project, it must be configured appropriately. To start, click Create Credentials:
For Credential Type, select User data and click Next:

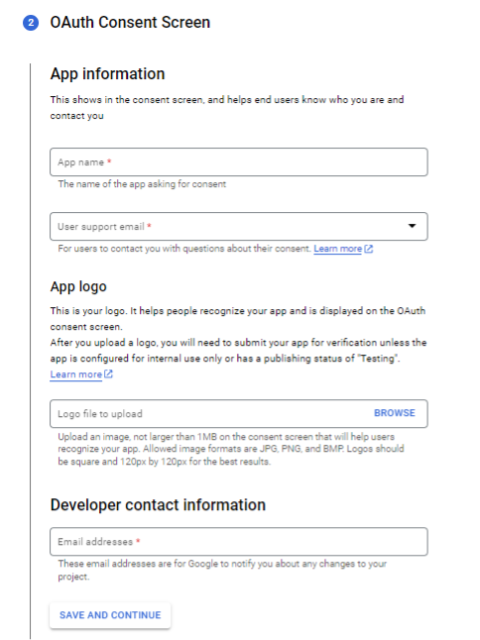
Enter a name for the application and the email address that will be provided for support. (These will be displayed to the user who authorizes the rights to use the Gmail API). Add a developer contact email address as well and click Save and Continue:
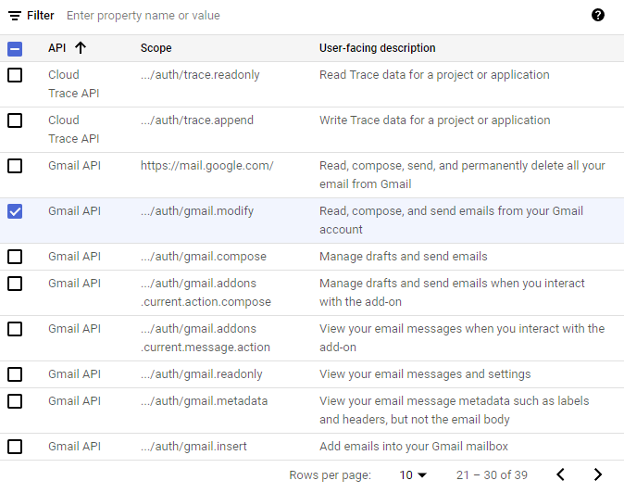
Under Scopes, click Add or Remove Scopes. Add the Gmail API scope for “…/auth/gmail.modify” to allow for reading, composing, and sending emails from the Gmail account. Click Update, then click Save and Continue:

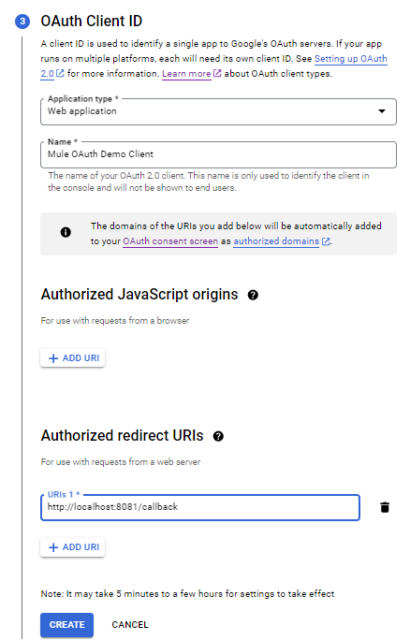
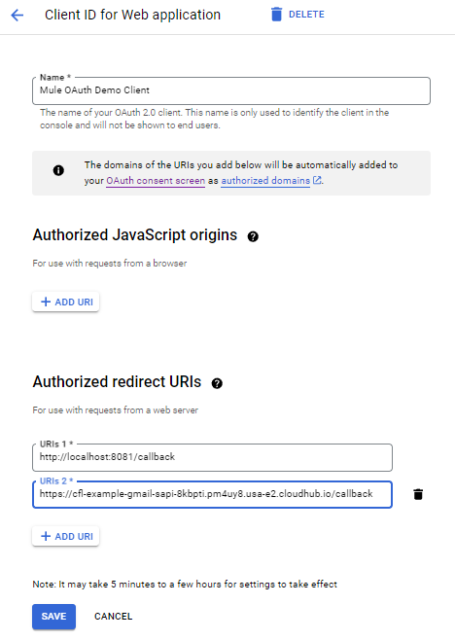
For the OAuth Client ID, select Web Application for Application type and give a name (e.g. “Mule OAuth Demo Client”). Add an Authorized Redirect URI of http://localhost:8081/callback. This section will be revisited later upon deployment to CloudHub 2.0 to add the CloudHub 2.0 API callback URL. Click Create:
After clicking Create, the client credentials (client ID and client secret) are generated and available for download as a JSON file. Download this file as the client ID and secret will be needed later. [This JSON file also contains the Auth URL and the Token URL which will be used later.]. Click Done.
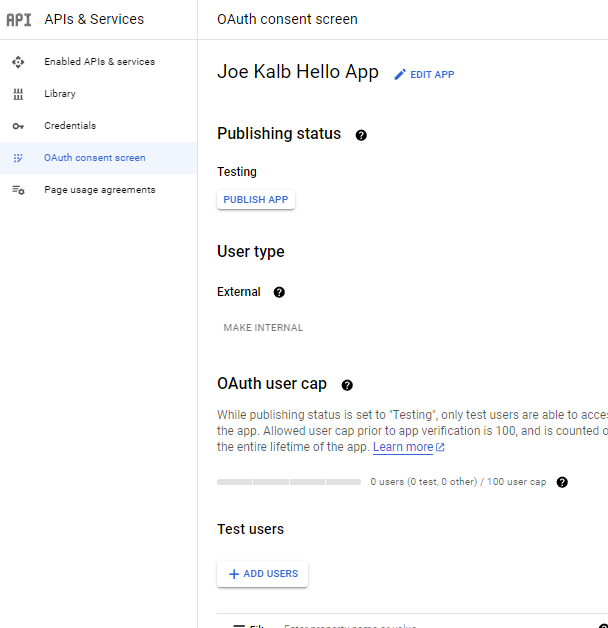
At this point, only one thing remains te be able to test out the API. With the Google project in a Testing status, simply add test users. Only specified Google accounts will be able to use the credentials just created in order to call the Gmail API. Therefore, test users must be added. From the project’s main page -> APIs & Services -> OAuth consent screen, click the Add Users button:
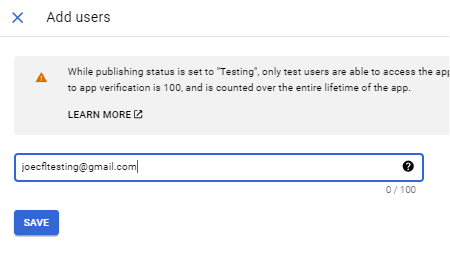
Add the email address(es) that will be using the Mule-to-Gmail application and click Save:
With this in place, the Google setup is complete, and that Gmail account is now configured inside the MuleSoft application to call Gmail APIs.
Download Gmail Connector from Anypoint Exchange
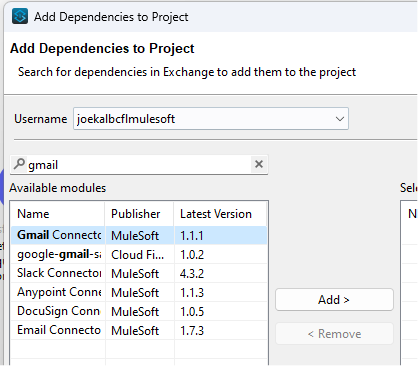
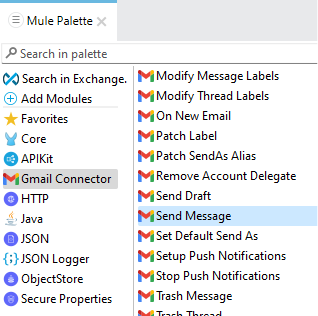
Create a new project in Anypoint Studio. In the Mule Palette, click Search in Exchange. search for “Gmail”. Select the “Gmail Connector” and click Add:
After this step has been performed, in the Mule Palette you will see dozens of Gmail components available to be added to the MuleSoft application. For this example, we will use the Send Message component:
Set Up OAuth 2.0 Authorization Code Flow
How OAuth 2.0 Authorization Code flow Works
The OAuth 2.0 Authorization Code flow is a standard commonly used throughout the technology industry. It involves a manual step to grant/authorize access and then upon that authorization, an authorization code is provided back to the user. The authorization code is then combined with the client ID and client secret to get an access token, and the access token is what is used as the authorization for the actual API calls. A good intro to this is found in this documentation from oauth.net. Mulesoft also has some of its own useful documentation here.
How to Configure Authorization Code Flow in Mule Application
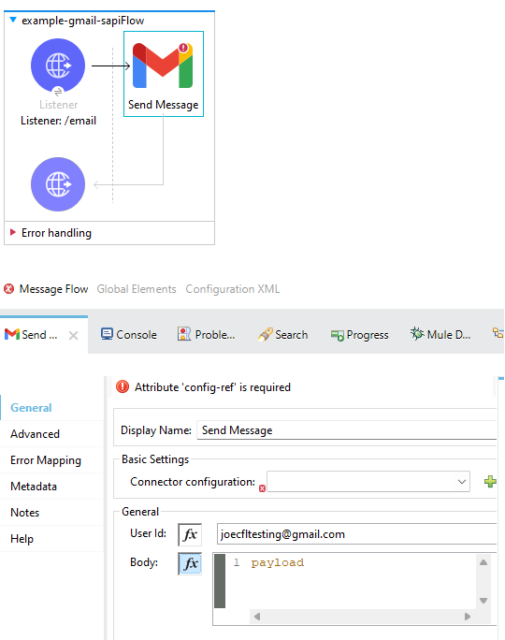
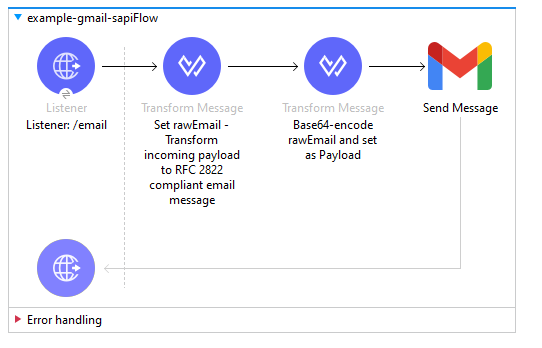
Within a new Mule application in Anypoint Studio, create an HTTP Listener to receive messages to the /email endpoint. Assume for the time being that the payload is set up for the send to the Gmail API (this will be handled later in this post). Add a Send Message component to the flow. In the Send Message component, configure User Id as the email address to be used to send the email (e.g. joecfltesting@gmail.com). [Note that this email address is the one that will have to provide authorization to use the Gmail API in the OAuth 2.0 authorization code flow.] Then click the green plus button to configure a new Gmail Connector configuration:
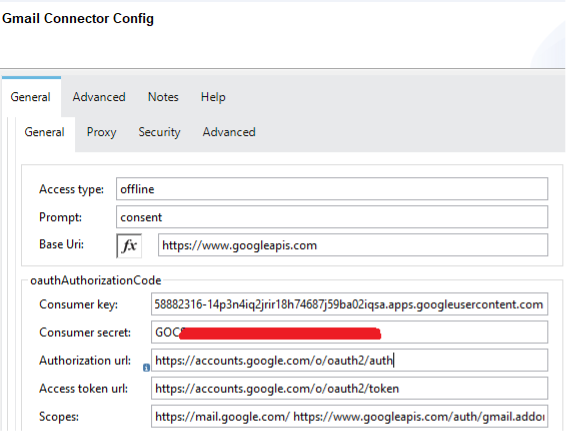
The Consumer key, Consumer secret, Authorization URL, and Access token url field values are all available from the JSON file downloaded in steps earlier from the configuration within the Google console. For scopes, enter https://www.googleapis.com/auth/gmail.modify to match what was configured within the Google console in those earlier steps:
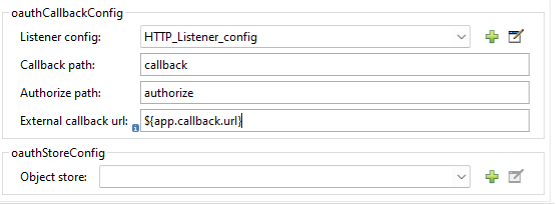
Scroll down to the oauthCallbackConfig section. For the Listener config, select the same HTTP Listener that is in place for the application’s /email endpoint. For the Callback path, configure “callback”. In the Authorize path, configure “authorize”. In the External callback url, configure a property value: ${app.callback.url}. This value will get set as http://localhost:8081/callback when running locally; when deploying to CloudHub 2.0 in later steps, this app.callback.url property will get set in the Properties section of Runtime Manager for the deployed application:
Scroll down to the oauthStoreConfig section. Click the green Plus symbol to create a new Object store configuration. [Note: If the green Plus button doesn’t open anything, try going to the main flow and adding an Object Store component to the flow and then deleting that component. This will bring the Object Store connector dependency into the application, which is required to create the Object store configuration.]
Name this Object store “OAuth_object_store” and make sure Persistent is checked. [Setting it as “Persistent” is important for deployment to CloudHub 2.0 because it will use Object Store v2 which will allow the authorization to last between deployments. Without setting this to persistent, a user has to reauthorize the app to use Gmail API at each re-deployment.] Click OK, and click OK again to save the Gmail Connector configuration:

With this in place, the Gmail Connector is configured for use (including its OAuth setup), and it is time to set the actual payload to send to the Gmail API.
Generate Proper Payload for Sending Mail
The next step is to actually set the payload for the Gmail Send Message component. The basic example will send an email with attachments based on the input payload. The written version of this example will show how to do this using DataWeave, but the accompanying video shows DataWeave and an alternative option: a static Java class.
The Gmail API documentation is challenging to grasp as far as what exactly should go into the payload request to the Gmail API. Ultimately, an RFC 2822 compliant payload should be sent, base64-encoded, to the Gmail API.
The following assumes that an input request comes to MuleSoft like this:
{

"fromEmail": "joecfltesting@gmail.com",
"toEmails": ["joe.kalb@cloudfirstlabs.com"],
"subject": "Sample HTML email with attachment",
"emailBody": "<html><h1>Joe was here</h1><h2>Header2</h2>Here is some normal text. And here is a <a href=\"https://www.cloudfirstlabs.com\">link</a></html>",
"attachments": [
    {
      "fileName": "someText.txt",
       "contentType": "text/plain",
       "base64Content": "SGVyZSBpcyBzb21lIHRleHQgaW4gYSB0eHQgZmlsZQ=="
    }
   ]
}
The following DataWeave Transform should be placed upon reception of this payload. Assign the output to a variable named rawEmail.
%dw 2.0
import java!java::lang::System
var toEmailString = (payload.toEmails reduce(item,accum="") -> (accum ++ if (accum == "") item else "; " ++ item))
output text/plain
---
'Content-Type: multipart/mixed; boundary=bndry_sprtr' ++ System::lineSeparator() ++
'MIME-Version: 1.0' ++ System::lineSeparator() ++
'From: ' ++ payload.fromEmail ++ System::lineSeparator() ++
'To: ' ++ toEmailString ++ System::lineSeparator() ++
'Subject: ' ++ payload.subject ++ System::lineSeparator() ++
System::lineSeparator() ++
'--bndry_sprtr' ++ System::lineSeparator() ++
'Content-Type: text/html' ++ System::lineSeparator() ++
'MIME-Version: 1.0' ++ System::lineSeparator() ++
'Content-Transfer-Encoding: 7bit' ++ System::lineSeparator() ++
System::lineSeparator() ++
payload.emailBody ++ System::lineSeparator() ++
System::lineSeparator() ++
((payload.attachments reduce (item, accumulator="") -> (
    accumulator ++
    '--bndry_sprtr' ++ System::lineSeparator() ++
    'Content-Type: ' ++ item.contentType ++ System::lineSeparator() ++
    'MIME-Version: 1.0' ++ System::lineSeparator() ++
    'Content-Transfer-Encoding: base64' ++ System::lineSeparator() ++
    'Content-Disposition: attachment; filename="' ++ item.fileName ++ '"' ++
System::lineSeparator() ++
    System::lineSeparator() ++
    item.base64Content ++ System::lineSeparator() ++
    System::lineSeparator())) default '')
++ '--bndry_sprtr--'
It is beyond the scope of this article to detail each part of the DataWeave, but know that it is transforming the input payload to an RFC 2822-compliant email message. Then in the follow-up step, that raw RFC 2822 message should be base64-encoded and passed in the raw field of a JSON output payload. To handle this, add one additional DataWeave transform step with the following transform:
%dw 2.0
import java!java::lang::System
import * from dw::core::Binaries
output application/json
---
{
  raw: toBase64(vars.rawEmail)
}
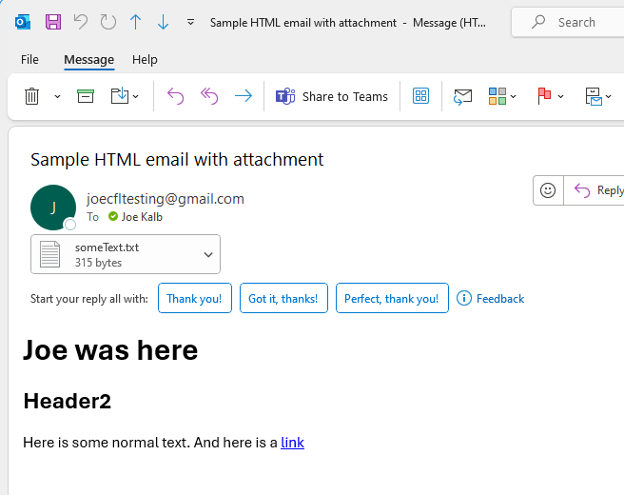
Put these two transforms back to back before the Gmail Send Messages component and the basic application is ready to test locally. With the above example payload (changed to use relevant email addresses), the running Mule application should successfully send an email with attachment(s) using the Gmail API:
Test the Application Locally
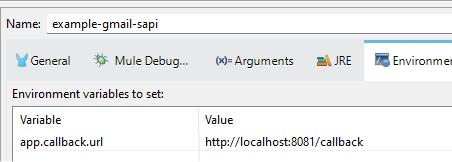
To test the application locally, the first step is to set the app.callback.url property. Right-click the application in Package Explorer -> Debug As -> Debug Configurations. Then go to the Environment tab. Add an entry for app.callback.url and a value of http://localhost:8081/callback:
Now that this is set, the application is ready to deploy locally. Go to Package Explorer -> Debug As -> Mule Application to run the application. It should start successfully.
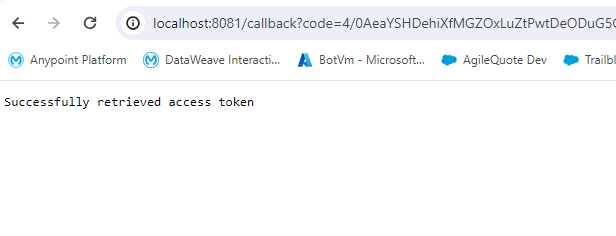
Before a request can be made to the local API, a user must authorize the application. To do this, visit http://localhost:8081/authorize. This will have the user log in to a Gmail account and grant access. At the end of this, the user should see a screen that says “Successfully retrieved access token”. The authorization code is found in the browser bar after the callback URL configured in the app (e.g. http://localhost:8081/callback). [Note: This is the reason http://localhost:8081/callback had to be added as a redirect URI in the Google console setup.]
Under the covers, MuleSoft uses that authorization code, along with the configured client ID and client secret, to get an access token for any calls to the Gmail API. [The access token and any and all refreshing is handled under the covers as well by MuleSoft using the object store configuration set up earlier.] Regardless, with this completed, the application is now ready to run and successfully make requests to the Gmail API. From Postman (or the application of choice), POST the payload mentioned a few sections above into an HTTP request to http://localhost:8081/email :
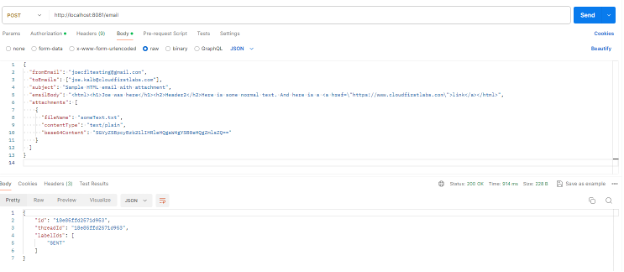
A 200 status should be returned with a SENT in the response payload. And the email should show up in the inbox(es) configured in the payload:
When you reach this step it is ready to be deployed into CloudHub 2.0.
Deploy Application with Proper Settings
It is beyond the scope of this post to detail every step of deployment to CloudHub 2.0, but there are a few key ideas that should be highlighted.
- The application should run in Runtime Cluster Mode in CloudHub 2.0.
- The application should run with Object Store v2 configured.
- The URL generated by Anypoint upon deployment must be configured in the Google setup to allow the callback URL to be called as part of the OAuth 2.0 Authorization Code flow.
- The app.callback.url property must be configured with the Anypoint-generated URL to set the callback URL when authorizing the application to use Gmail API.
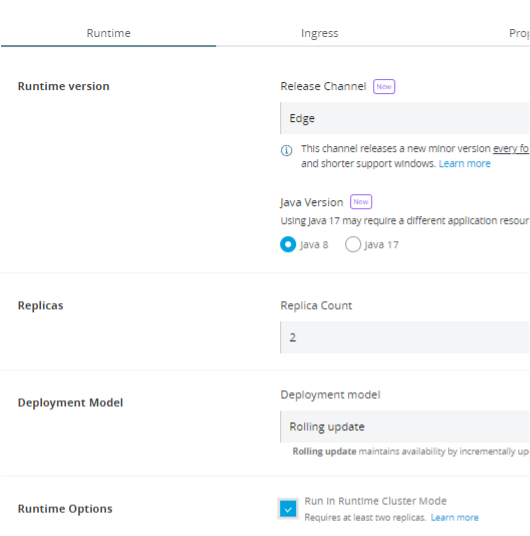
Key Idea: Run Application in Runtime Cluster Mode
When running in Runtime Manager with 2 or more replicas, run in Runtime Cluster Mode. This is to support the successful setup of the OAuth 2.0 Authorization Code flow. When running as a cluster, the multiple replicas share memory and therefore share the authorization code provided back at the end of the manual authorization step upon initial deployment. Without running in cluster mode, every single replica must individually run the authorization step:
Key Idea: Configure Object Store V2
Run this application using Object Store V2. This enables the object store to survive redeployments, keeping a user from needing to reauthorize the application every time the application redeploys:

Key Idea: Configure CloudHub URL into Redirect URIs in Google
After the application attempts to deploy initially, it should provide a public endpoint. Use this and append /callback (e.g. https://cfl-example-gmail-sapi-8kbpti.pm4uy8.usa-e2.cloudhub.io/callback) and configure the value into the Google setup as a Redirect URI. (Do this from Google Console -> project -> APIs & Services -> Credentials -> the specific OAuth 2.0 Client ID -> Add URI) :

Key Idea: Set the app.callback.url Runtime Property
In the Properties tab of Runtime Manager for this application, set app.callback.url equal to the CloudHub URL. This should hold the same value as entered into the Authorized redirect URIs in the Google console. Apply Changes to re-deploy the app to CloudHub 2.0 with this property set. Upon redeployment, the application should be ready to run, to manually do the authorization step, and then to integrate successfully with the Gmail API.
That’s all there is to integrate with Gmail API using Mulesoft!
By doing the steps above, this API should deploy successfully to CloudHub 2.0 and be ready to integrate with Gmail. While I do not show a specific use case, the power of MuleSoft for integrating and orchestrating between numerous systems is obvious. This template can easily be applied to other business processes or APIs, not just Gmail.
A walk-through video demonstration of the steps I took to integrate with Gmail API using Mulesoft can be found here on our YouTube channel:
Talk to the Professionals!
To learn more about our MuleSoft RPA, MuleSoft and EDI, or Salesforce services, please visit our website or fill out a Contact Us form here.