Getting Started – EDI is easy using MuleSoft Partner manager
This article details how to set up an FTP solution via Anypoint Partner Manager for receiving an X12 850 Purchase Order message from a trading partner. The configured message flow will receive the message in the X12 EDI format, convert it to JSON, FTP back an acknowledgment (997 Functional Ack), and then send the JSON to a Process API which can deliver the appropriate data to any relevant systems. and process it to those same systems.
Note that there will be several references to steps completed as part of a previous article implementing an AS2 “Receive from Partners” endpoint and message flow. The references to previously completed work demonstrate the power of Partner Manager because it allows these components to be reused for numerous trading partners and protocols.
Pre-requisite
A pre-requisite for completing the steps in this How-To article is having access to an FTP server.
Create New Message Flow
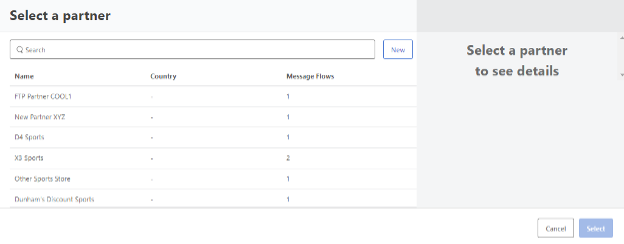
Open up MuleSoft Partner Manager in Anypoint and click Message Flows. Click “New message flow” -> “Receive from Partner”. This will open a new window asking which partner the message flow is for:
Create New Partner
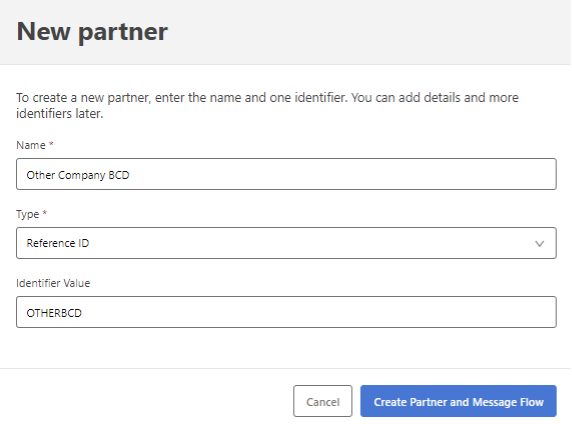
From the “Select a partner” popup, click the New button. Enter the name (Other Company BCD). Then for Type, select Reference ID and enter an Identifier Value (OTHERBCD). Click Create Partner and Message Flow:
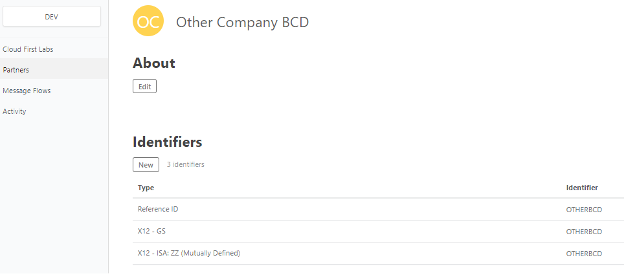
After this, add two additional identifiers to this partner. Go to Partners on the left-hand side and add two new Identifiers: one for “X12 – GS”, Identifer Value = OTHERBCD. For the other, set Type = “X12 – ISA”, Qualifier = ZZ, Identifier Value = OTHERBCD. This configures the partner as needed:
With this done, go back to the Message Flow.
Create New Endpoint
At this point, the Message Flow is created. The first step is to set up a new endpoint for receiving Purchase Order EDI messages. Click “Receive from Other Company BCD”:
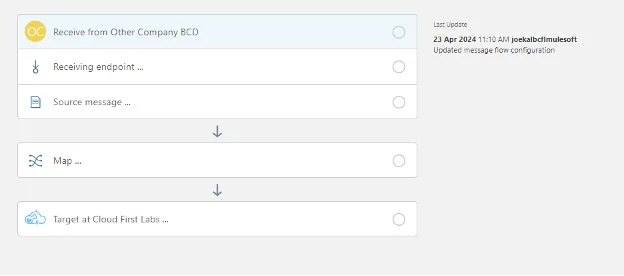
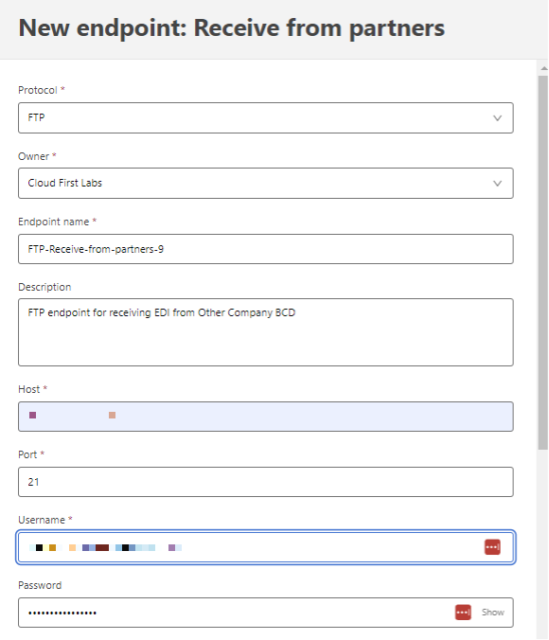
Click Select Endpoint. It will show “No endpoint selected” under “Receiving endpoint”. Click the Select button. Click New. For protocol, select FTP.
Keep the owner as the name of the in-use organization (e.g. Cloud First Labs). Set the endpoint name as desired. Provide a meaningful description. For host, port, username, and password, enter the FTP login information for the prerequisite FTP location (Note that access to these FTP locations will be required to successfully work through this example.):
Scroll down to the Source path and enter /OtherBCD. Leave the polling frequency at 1 minute, meaning this location will be checked for new messages every 1 minute. For Support Format type, select EDI. Leave the size check wait time at 1 second, and for File name pattern, use *.edi. This is the file format the receiver will look for. For archival path, enter /OtherBCD/archive; this is where the source files will get moved to after intake for processing. Click Save:
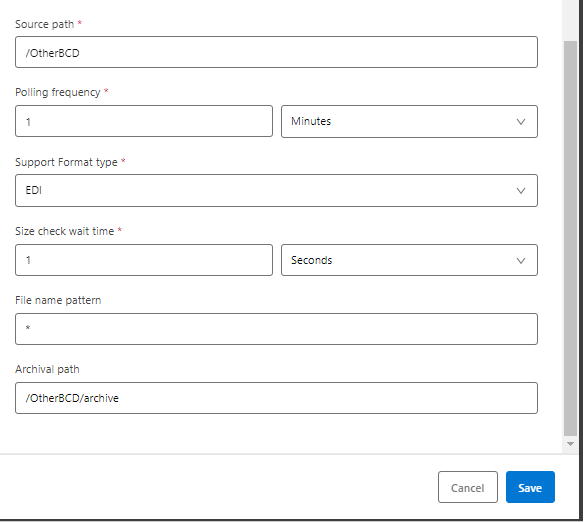
With this saved, the endpoint is set up. Next, the Source Message must be configured.
Select Message Type
Click Source message and “No message type selected” should show up. Click the Select button. Click New to create a new message type. For Format, select X12. For Version, select 4010. For Message Type, select 850. (X12 850 messages are Purchase Order messages.) Leave the Reference identifiers and attributes mapping field blank, and for Schema, select “Use standard X12-4010-850”. Click Save:
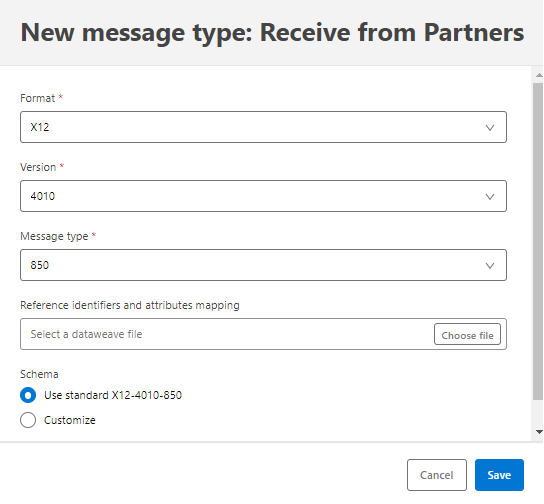
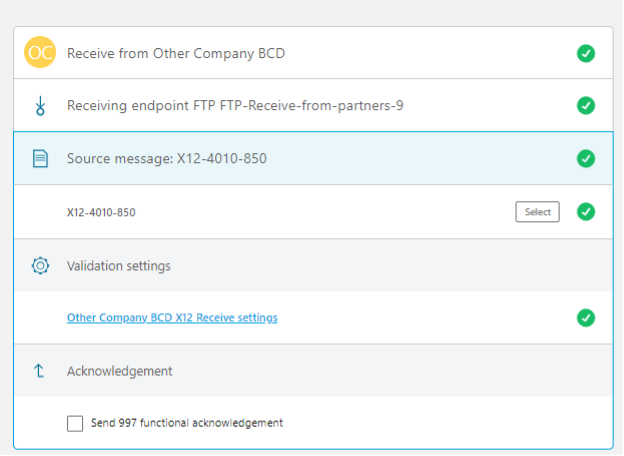
Now the message type is set up. Leave the Validation settings as defaulted. This example’s next configuration is an Ackowledgement which will be automatically generated and dropped in the same FTP location to be picked up by Other Company BCD:
Configure the Acknowledgement
Under Acknowledgement, check the “Send 997 functional acknowledgement” box. Click Select to select the endpoint to deliver to. Click New to create a new endpoint.
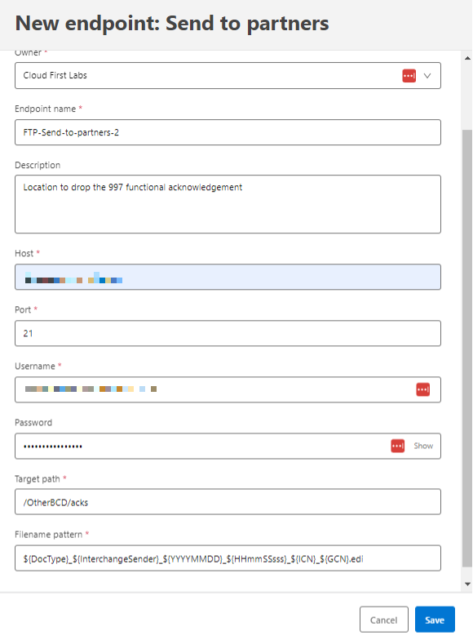
Set Owner = Cloud First Labs, protocol = FTP. Set an endpoint name and description. For host, port, username, and password, use the FTP credentials from the prerequisite FTP location. For Target path, set “/OtherBCD/acks”. For Filename pattern, leave it as default. Click Save. This configures the flow to automatically generate a 997 acknowledgement for the sender’s consumption:
Configure the DWL Data Transformation
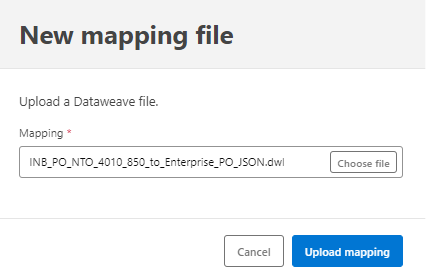
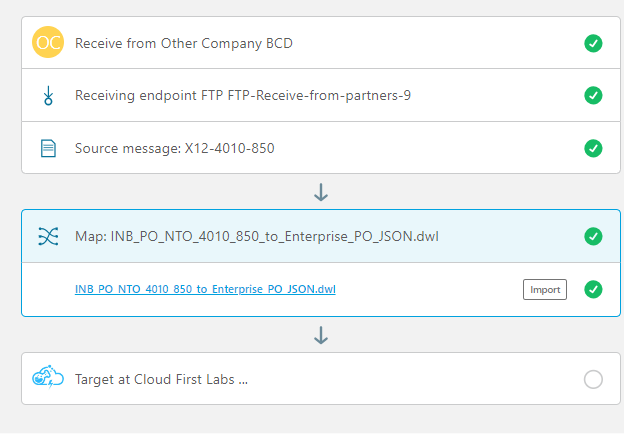
Click Map to open up the Map section. My previous AS2 EDI article has more detail on how this .dwl file is generated; in this example, the assumption is that this .dwl transformation file already exists on the local computer. Click Import. Find file ‘INB_PO_NTO_4010_850_to_Enterprise_PO_JSON.dwl’ (from this example in Anypoint Exchange) and click Upload mapping:
With this done, the data transformation (from EDI to JSON) is set up and the final step remains to deliver the JSON to the Process API:
Configure the Target Endpoint
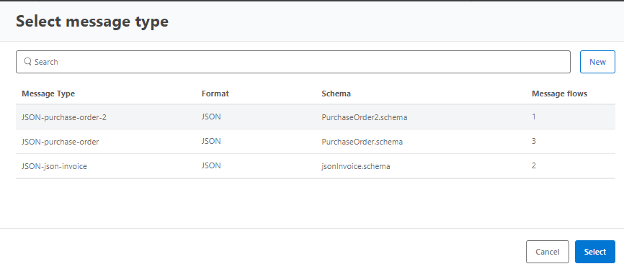
Click “Target at Cloud First Labs” and for message type, click Select. This example will reuse the JSON-purchase-order-2 message type that was created as part of this prior article. See that article for how this message type was originally configured. Select the Message type and click Select:
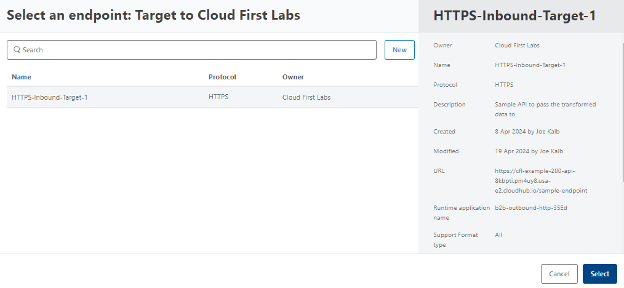
For endpoint, click Select. This example will once again take advantage of reuse and use the HTTPS-Inbound-Target-1 which was set up as part of the prior How-To article . Select the target and click Select:
Deploy the Message Flow
Upon doing the previous steps, the Message Flow is ready for deployment:
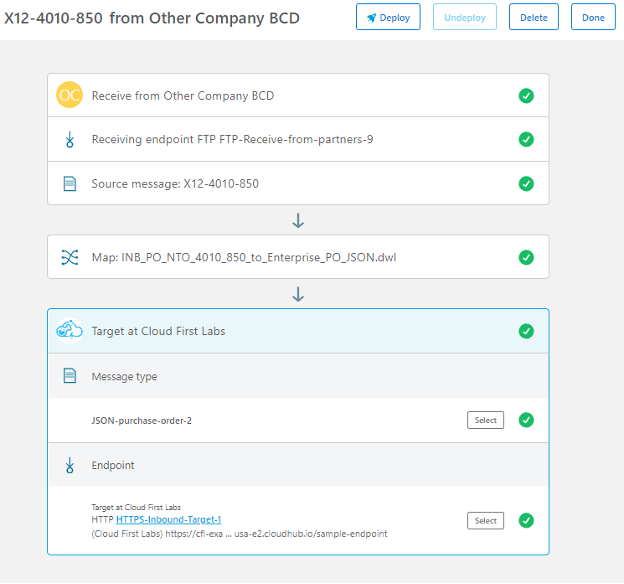
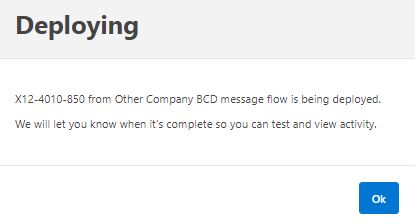
Click Deploy. Add whatever comment is appropriate, and click Deploy. A pop-up window will show up:
Test the Message Flow
Once the deployment is complete, test the flow by placing a file in your FTP input location (e.g. ftp.someftpserver.com/OtherBCD). The file should be a valid X12 850 message, such as the following:
ISA*00*          *00*          *ZZ*OTHERBCD       *ZZ*CLOUDFIRSTLABS *200915*0103*U*00401*000000135*0*P*>~

GS*PO*OTHERBCD*CLOUDFIRSTLABS*20200915*0103*135*X*004010~

ST*850*0001~

BEG*00*NE*PO-DEMO-20200912-002**20191018~

REF*VR*7429271~

PER*BD*Tim Brown*EM*[email protected]~

PO1*1*20**34.45****MG*324791~

PID*F****8.5" x 11" Copy Paper, 20 lbs, 92 Brightness, 5000/Carton (324791)~

N1*ST*Salesforce West*92*338~

N3*50 Fremont St*Suite 1456~

N4*San Francisco*CA*94105*US~

PO1*2*80**1.95****MG*2072174~

PID*F****Hype Tank Highlighters, Chisel, Yellow, Dozen (29203)~

N1*ST*Salesforce East*92*367~

N3*350 Mission St*Floor 5~

N4*San Francisco*CA*94105*US~

PO1*3*65**5.08****MG*163865~

PID*F****Notepads, 8.5" x 11.75", Wide Ruled, White, 50 Sheets/Pad, 12 Pads/Pack (51295/2~

N1*ST*Salesforce Tower*92*587~

N3*415 Mission St*Floor 3~

N4*San Francisco*CA*94105*US~

PO1*4*30*PH*11.77****MG*467951~

PID*F****Lightweight Moving & Storage Packing Tape, 1.88"W x 54.6 Yards, Clear, 6 Rolls (~

N1*ST*Tableau Palo Alto*92*1564~

N3*260 California Ave*Ste 300~

N4*Palo Alto*CA*94306*US~

CTT*4~

SE*26*0001~

GE*1*135~

IEA*1*000000135~
Save the file as FileFromBCDtoCFL.edi and place it in the FTP location for receiving from the partner (e.g. ftp.someftpserver.com/OtherBCD):
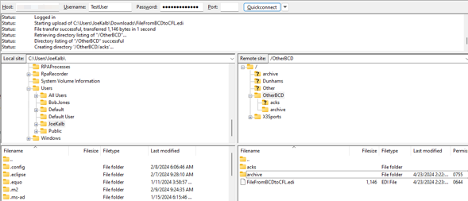
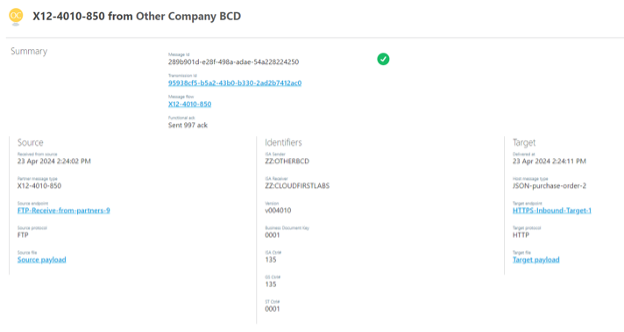
Within one minute, the FTP listener configured above should pick up the message and process it. After it picks it up, view the Activity screen in Partner Manager. It should show the message in Delivered status:

Click into the message and more details are available (including payloads which can be clicked on for inspection:
Finally, check the FTP location under /OtherBCD/acks to see the 997 functional acknowledgment which was generated:
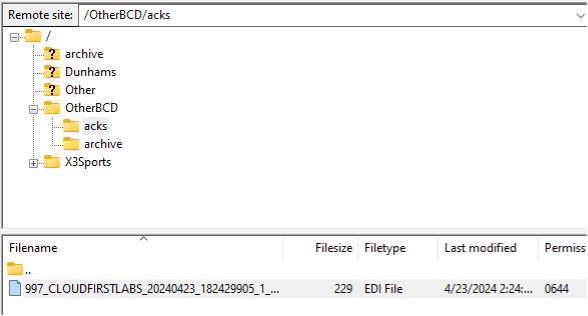

This shows that processing was successful all the entire way through(the image is really small, but trust us!).
Conclusion
With the steps carried out in this article, a successful FTP EDI setup can be put in place thanks to the Mulesoft Partner Manager functionality in Anypoint. It can be expanded on as well, allowing easy configuration to set up multiple trading partners, message types, and protocols. As with most types of integration, MuleSoft Partner Manager makes business to business EDI integration straightforward. For a guided tour of getting this set up, check out my YouTube video:
Talk to the Professionals!
To learn more about our MuleSoft RPA, MuleSoft Partner Manager and EDI, or Salesforce services, please visit our website or fill out a Contact Us form here.

