
Overview – Sending AS2 EDI in MuleSoft
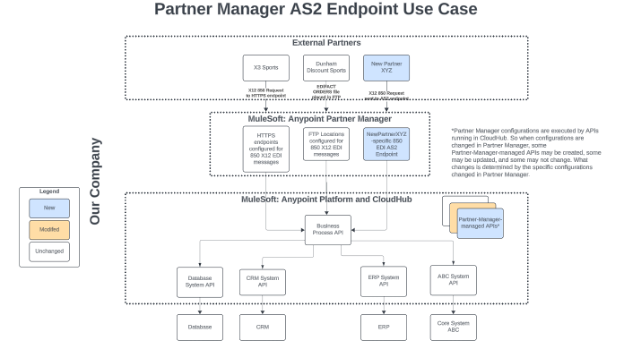
Anypoint Partner Manager is a great product for enabling the straightforward setup of an organization’s B2B environment. It allows for easily dealing with a myriad of partner-specific configurations, message types, and protocols. Partner Manager supports data transfer via HTTP, FTP, and AS2. This article and accompanying video walk through how to set up a new partner integration for a partner (“New Partner XYZ”) sending X12 850 Purchase Orders to an organization (“Cloud First Labs”) via AS2. A diagram showing the approach is below [Note that in this example, there are other partners already configured to send EDI data to the organization via HTTP and FTP.] :
Create Private Keys and Public Certificates
AS2 requires mutual authentication, meaning the receiver and sender must each generate their own private key and public certificate. The sender must send the sender’s public certificate and the receiver must trust that sender public cert. The receiver must provide the sender with a public certificate and the sender must trust that receiver public cert.
In the real world, these private keys and certificates will be generated by Security teams from the two trading partner organizations, and the certificates will likely be signed by certificate authorities per organizational standards. However, to demonstrate the Partner Manager AS2 capability end-to-end, this example will generate self-signed certificates.
To generate a private key (cloudfirstlabs_private_key.key) and certificate (cloudfirstlabs_public_cert.cer) for the receiver, run the following command in Git Bash:
winpty openssl req -newkey rsa:2048 -keyout cloudfirstlabs_private_key.key -x509 -days 365 -out cloudfirstlabs_public_cert.cer
(At prompts, use Cloud-First-Labs-specific information, and make sure to remember the password used.)
To generate a private key (cloudfirstlabs_private_key.key) and certificate (cloudfirstlabs_public_cert.cer) for the receiver, run the following command in Git Bash:
winpty openssl req -newkey rsa:2048 -keyout newpartnerxyz_private_key.key -x509 -days 365 -out newpartnerxyz_public_cert.cer
(At prompts, use New-Partner-XYZ-specific information, and make sure to remember the password used.)
These private keys and certificates will be used later.
Partner Manager: Create Partner
Log in to Partner Manager. Click Partners. Click Create partner. Enter the name (New Partner XYZ) and create the identifier as Type = “AS2 identity” and Identifier Value = “newpartnerxyz”. Then click New under Identifiers to add a new “X12 – GS” identifier with value “NEWPARTNERXYZ”. Then click New one more time to add a new “X12 – ISA” identifier with value “NEWPARTNERXYZ” and Qualifier “ZZ”.
This configures the new trading partner in Partner Manager.
Partner Manager: Create New Message Flow
Click “Message Flows” in Partner Manager and click “New message flow”. Select “Receive from partner”. Select New Partner XYZ as the partner to configure the flow for.
Create New AS2 Endpoint
Click “Receiving endpoint” in the newly created Message Flow. Create a new one, and use Protcol = AS2. Name the endpoint with a meaningful name. Uncheck “Private port”. Leave HTTPS checked and leave Enforce security level as “Signed & Encrypted”:
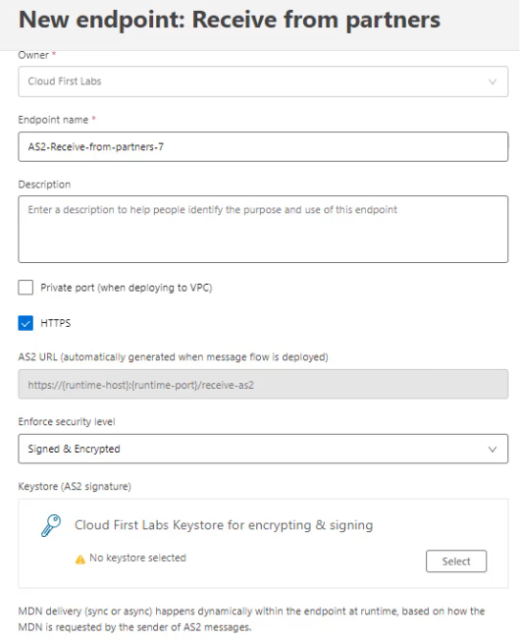
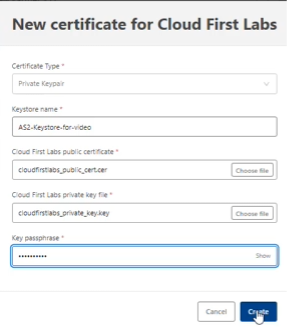
In the Keystore section, click Select to select a keystore. Then click New to create a new one. Choose the cloudfirstlabs_public_cert.cer file created in a previous section for the public certificate, and select the cloudfirstlabs_privatekey_key.key file created in previous section for the private key file. Then enter the password for the private key and click Create:
This successfully creates the keystore. After it is created, click Save to save the new AS2 endpoint.
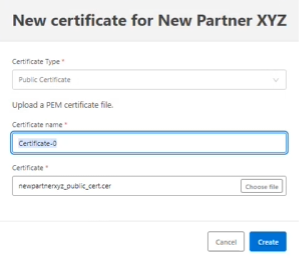
Add certificate for New Partner XYZ
Below the “Receiving endpoint” section, it prompts for a certificate for New Partner XYZ. Add one, of type Public Certificate, and upload the newpartnerxyz_public_cert.cer file created in a previous section. Click Create:
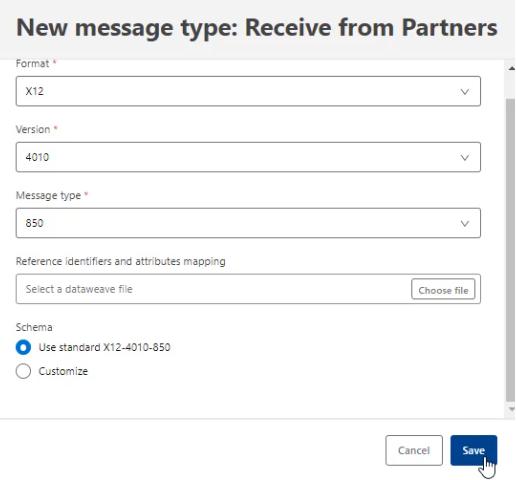
Add a new Message Type
With the certificate added, the next step is to add the Source message’s Message Type. Click Source message and then choose Select to select a Message Type. Then click New to create a new Message Type. This example uses the standard X12 version 4010 850 Purchase Order message, so select Format = X12, Version = 4010, Message type = 850, leave the mapping file blank, and set Schema = “Use standard X12-4010-850” and click Save:
Select the newly-created message type. Settings could be modified and a functional ack could be configured here, but for simplicity’s sake, this example leaves the Validation settings as the default and leaves the 997 functional acknowledgement checkbox unchecked.
Add DataWeave mapping file
The next configuration to provide is the DataWeave mapping file.
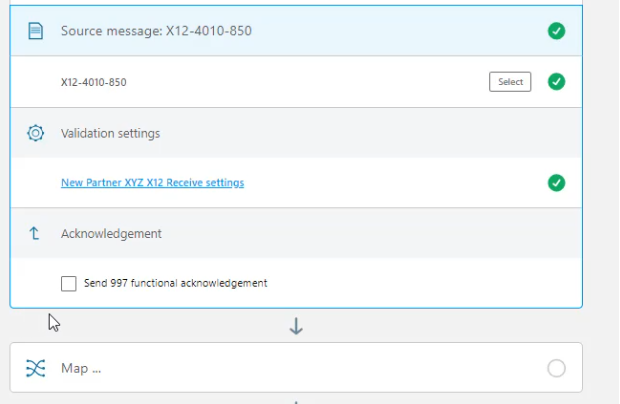
Click Map and see that an Import button shows up. Before importing, this file needs to be available on the local computer. In the real world, this will be a carefully developed DataWeave transformation file developed in accordance with the requirements. In this example case, an X12 850 message needs to get converted to PurchaseOrder JSON to be sent on to a Process API. This example in Anypoint Exchange can be downloaded and the INB_PO_NTO_4010_850_to_Enterprise_PO_JSON.dwl file from within that example can be used for this purpose. Download the example. Then click Import and import the .dwl file.
This is the transformation that will be applied to the incoming X12 message.
Configure the Target
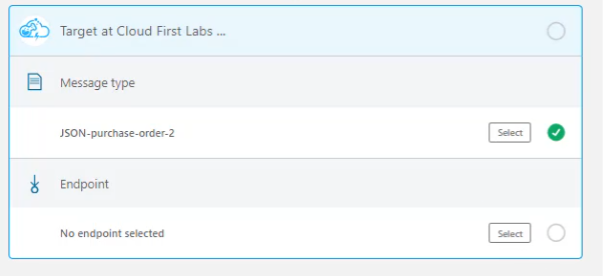
Configure the Target Message Type
The next step is to open up the Target at Cloud First Labs section and select a Message Type. Click New to create a new Message Type. Select Format = JSON. For Schema, create a file on the local computer named PurchaseOrder2.schema and have it contain a simple empty JSON object: {}. This simple JSON schema will permit any valid JSON. In a real world scenario, this JSON schema would be a real JSON schema defining what the Process API JSON message should contain, but for simplicity’s sake this example permits any JSON to flow through. Click Choose file and select PurchaseOrder2.schema and click Save.
Configure the Target Endpoint
With the target message type in place, the next step is to set up the target endpoint:
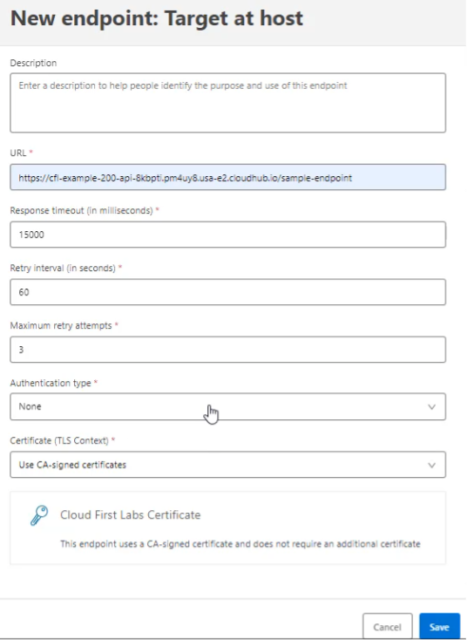
In the real world, this will point at a Process API used to handle messages and deliver data to target systems, and the Process API will require authentication. In this case, the configured endpoint is a simple API (cfl-example-200-api) deployed to CloudHub 2.0 which simply logs the message and returns a 200 OK response, and it does not require authentication.
Configure an appropriate URL and select None for Authentication type and click Save:
At this point, the message flow is fully configured and ready for deployment:

Partner Manager: Deploy Message Flow
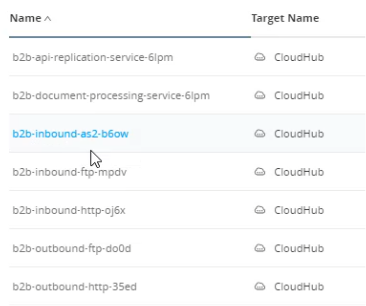
Click Deploy to deploy the Message Flow and enter comments. It will take a few minutes to deploy. Under the hood, the deployment was deploying applications to Anypoint Platform. They are visible in Runtime Manager. The AS2 receiver is deployed as an application named b2b-inbound-as2-<identifier>. Also, application b2b-outbound-http-<identifier> is used to send the transformed JSON to the configured Process API. And the message flow depends on b2b-api-replication-service-<identifier> and b2b-document-processing-service-<identifier> to do common Partner Manager work (these applications are used for all Partner Manager transactions, no matter which protocols are being used):
Now that the message flow and its corresponding applications are deployed, a simple locally-running Mule application can be used to send an AS2 message to the AS2 endpoint that was just deployed in Partner Manager.
Anypoint Studio: Create Client App to Test AS2 Endpoint
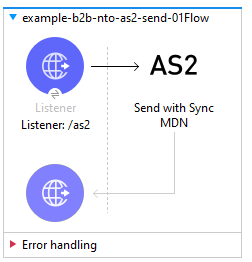
Open up Anypoint Studio. Create a new Mule project and add a basic HTTP Listener on port 8081 at path /as2. In the Mule Palette, double-click “Search in Exchange” and search for AS2. Add “AS2 Connector” to Selected modules and click Finish. This enables use of the AS2 Connector in the Mule application.
From the Palette, select AS2 Connector and drag Send with Sync MDN to the flow on the HTTP Listener:
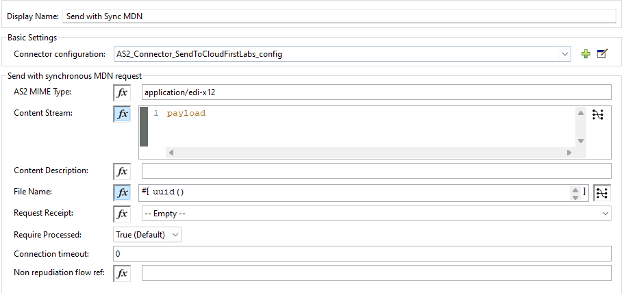
Configure the “Send with Sync MDN” component to use AS2 MIME Type = “application/edi-x12” and let it use payload for the Content Stream. Leave the rest of the values default except for the Connector configuration:
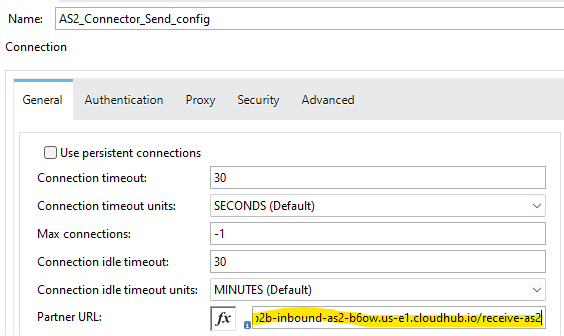
For the Connector configuration, add a new one and configure a Partner URL = <the URL for the AS2 Receiver found in Partner Manager>. To find this URL, go to the deployed message flow, open up the Receiving endpoint and the endpoint is displayed:
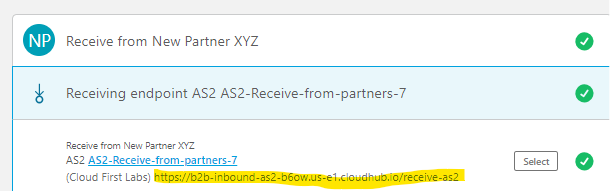
Configure that into the Partner URL field:
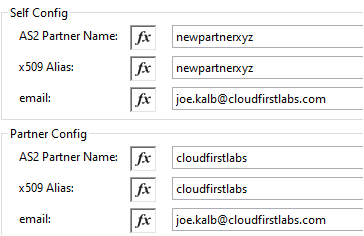
Next, go to the Security tab. Scroll down to the Self Config and Partner Config section of the Security tab. For this, the AS2 Partner names must be set in accordance with what was configured inside Partner Manager. So AS2 Partner Name for Self Config is “newpartnerxyz” and AS2 Partner Name for Partner Config is “cloudfirstlabs”. This is because this sending Mule app is demonstrating sending from New Partner XYZ to Cloud First Labs.
For x509 Alias, the alias to use is dependent on a keystore file which still needs to be generated. Earlier in this article, private keys and public certificates were generated for New Partner XYZ and Cloud First Labs. The private key for New Partner XYZ and the public certificate for Cloud First Labs should be put into a P12 keystore, and the aliases from that P12 keystore should be entered here. Run the following command to generate a new P12 keystore with the New Partner XYZ private key stored inside it.
winpty openssl pkcs12 -export -in newpartnerxyz_public_cert.cer -inkey newpartnerxyz_private_key.key -out newpartnerxyz.p12 -name newpartnerxyz -CAfile ca.crt -caname root
Note that the name (alias) of the private key is “newpartnerxyz”. Also make note of the export password entered here. The alias and keystore password will be used in the AS2 Connector Send configuration.
Then, import the Cloud First Labs public certificate into the same keystore with the following command.
keytool -import -alias cloudfirstlabs -keystore newpartnerxyz.p12 -file cloudfirstlabs_public_cert.cer
Note that the alias here is “cloudfirstlabs”.
Add the P12 keystore file newpartnerxyz.p12 into src/main/resources of this Mule application.
Back in the AS2 Connector Send config window in Anypoint Studio, on the General -> Security tab, configure the Self Config and Partner Config with the alias names just noted above. And for the email address, use the email address configured originally into the prompts for the private keys/certificates generated via openssl commands:
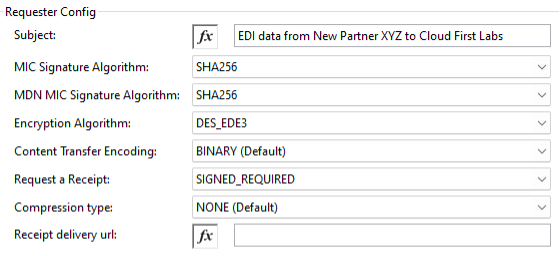
Scroll down and the next configuration is for Requester Config. Enter whatever subject is desired to be sent with the EDI messages to the AS2 Receive from Partners endpoint. Leave the rest of the Requester Config fields as the default values:
In the Keystore Config section, configure the keystore path as newpartnerxyz.p12 (which it will find since the file is now in src/main/resources in the project). And for keystore password and private key password, enter the password entered for the P12 file generation earlier:

Click OK to save the configuration. With this in place, deploy the application. Once it starts up, the next step is to send an X12 850 (Purchase Order) request to the locally-deployed endpoint, which will use the AS2 Connector to send an AS2 request to the Cloud First Labs AS2 Receive From Partners endpoint (which was configured earlier in Partner Manager).
Test Client App and AS2 Endpoint
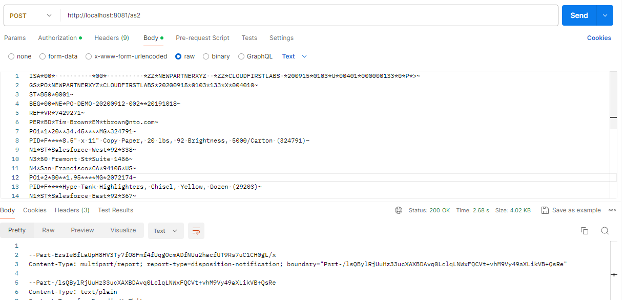
Once the application has deployed locally, open up Postman and send the following request (or another valid X12 850 request) to http://localhost:8081/as2.
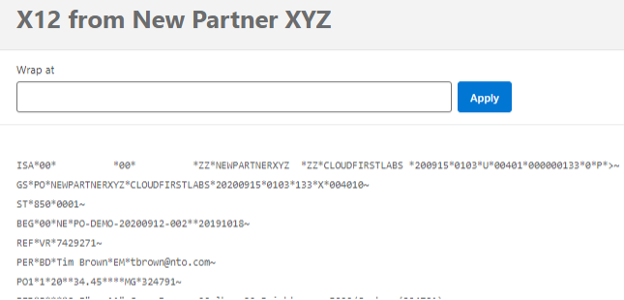
ISA*00*          *00*          *ZZ*NEWPARTNERXYZ  *ZZ*CLOUDFIRSTLABS *200915*0103*U*00401*000000133*0*P*>~

GS*PO*NEWPARTNERXYZ*CLOUDFIRSTLABS*20200915*0103*133*X*004010~

ST*850*0001~

BEG*00*NE*PO-DEMO-20200912-002**20191018~

REF*VR*7429271~

PER*BD*Tim Brown*EM*tbrown@nto.com~

PO1*1*20**34.45****MG*324791~

PID*F****8.5" x 11" Copy Paper, 20 lbs, 92 Brightness, 5000/Carton (324791)~

N1*ST*Salesforce West*92*338~

N3*50 Fremont St*Suite 1456~

N4*San Francisco*CA*94105*US~

PO1*2*80**1.95****MG*2072174~

PID*F****Hype Tank Highlighters, Chisel, Yellow, Dozen (29203)~

N1*ST*Salesforce East*92*367~

N3*350 Mission St*Floor 5~

N4*San Francisco*CA*94105*US~

PO1*3*65**5.08****MG*163865~

PID*F****Notepads, 8.5" x 11.75", Wide Ruled, White, 50 Sheets/Pad, 12 Pads/Pack (51295/2~

N1*ST*Salesforce Tower*92*587~

N3*415 Mission St*Floor 3~

N4*San Francisco*CA*94105*US~

PO1*4*30*PH*11.77****MG*467951~

PID*F****Lightweight Moving & Storage Packing Tape, 1.88"W x 54.6 Yards, Clear, 6 Rolls (~

N1*ST*Tableau Palo Alto*92*1564~

N3*260 California Ave*Ste 300~

N4*Palo Alto*CA*94306*US~

CTT*4~

SE*26*0001~

GE*1*133~

IEA*1*000000133~
This should return a 200 OK status and there should be some output in the response body:
After seeing it there, go to Partner Manager -> Activity and look for recent activity. It should show up there as well:
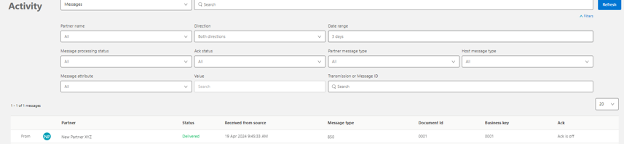
Upon clicking into it, there is an option to even see the source payload and the target payload.
Source payload:
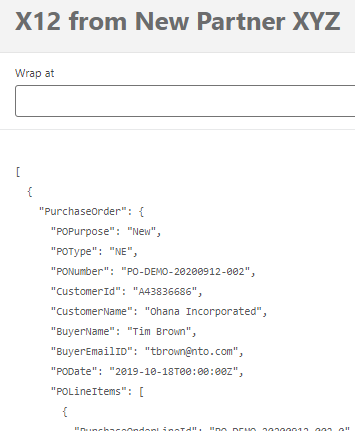
Target payload:
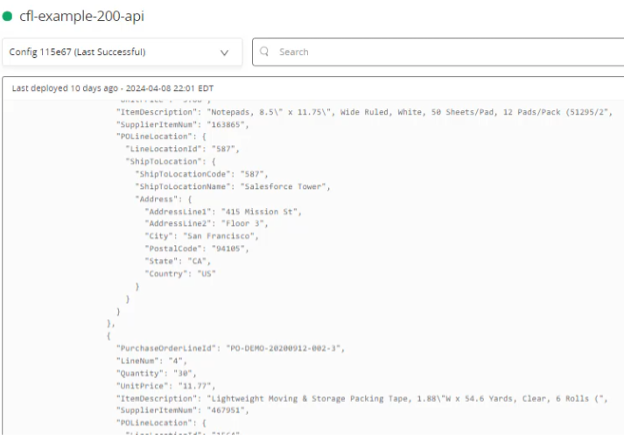
The logs of the target endpoint can also be checked (cfl-example-200-api in this example) and the JSON payload shows up in the logs (which in turn could be used for processing and orchestration to any and all required systems thanks to MuleSoft’s well-honed integration capabilities):
Conclusion
With the steps included in this article, a team can set up its own AS2 B2B endpoint for working with a trading partner. Partner Manager makes it easy to configure many partners, message types, and protocols. As shown here, Partner Manager gives plentiful options for configuring connections between disparate systems and makes setting up a complex environment simple and straightforward. For a guided tour of getting this set up, check out my YouTube video:
Talk to the Professionals!
To learn more about our MuleSoft RPA, MuleSoft and EDI, or Salesforce services, please visit our website or fill out a Contact Us form here.