Quote consistency for MSPs almost never becomes a visible problem while the team is still small. It shows up the moment the team starts growing — which is exactly the moment it becomes expensive to ignore.

Inconsistency Doesn’t Show Up Until You’re Growing

At two or three reps, quoting differences are invisible because everyone is close enough to every deal to catch problems informally. Add headcount, and that informal safety net disappears. One rep structures a quote a certain way because that’s how they learned it. Another pulls up an old quote from a similar customer and edits it in place. A third builds a new one from memory because they’ve closed that type of deal a dozen times before.
The customer on any single deal probably never notices. What they get still looks like a professional, complete quote. But internally, the business is now running three different versions of “how we quote,” each with its own assumptions about pricing logic, service lines, and structure.

What Inconsistent Quoting Actually Costs You

This isn’t just an aesthetic problem. Different quote structures create different handoff quality to service delivery, different assumptions about what’s included, and different pricing logic that makes it hard to spot when a deal is underpriced relative to your standard. It also makes onboarding new sales reps harder, because there’s no single source of truth for “this is how we quote a managed services renewal” versus “this is how we quote a new project.”
The deeper cost is that this kind of inconsistency is very hard to see from the top. Nobody schedules a meeting to discuss it, because no single quote looks broken. It’s the aggregate pattern — reviewed only when someone finally audits a batch of quotes side by side — that reveals how much variation has crept in.

Building Quote Consistency for MSPs Without Losing Flexibility

The instinct when this gets noticed is often to add process: more approval steps, more manual review, more oversight. That slows everyone down without actually fixing the root cause, which is that reps have no consistent starting point.

What MSPs actually need is repeatability that still leaves room for judgment. Common projects, standard service packages, renewals, and expansions shouldn’t require rebuilding the same logic every time a rep opens a new quote. The goal isn’t to remove flexibility — it’s to stop reps from reinventing the wheel on deals that are structurally similar to ones they’ve already closed successfully.

Quote Cloning, Group Cloning, and Templates: What They Solve

This is where quote cloning and group cloning earn their keep. Instead of starting from a blank page, a rep starts from a proven structure — the same service lines, the same pricing logic, the same layout that’s already been validated — and adjusts it for the specific customer in front of them. It’s a cleaner starting point, not a rigid script.
For Salesforce-native MSPs, this is the specific capability AgileQuote is designed around: repeatable quote structures that scale with the sales team instead of quietly fragmenting as headcount grows.
quote consistency for MSPs

Building This Into Your Growth Plan

If you’re planning to add sales headcount in the next year, quote consistency for MSPs is worth solving before the new hires start, not after. Growth doesn’t create quoting inconsistency out of nowhere — it exposes inconsistency that was already latent in the process, just at a scale small enough to go unnoticed.

A simple test: pull five recent quotes for the same type of engagement from five different reps. If they don’t look structurally similar — same sections, same required lines, same layout logic — you already have the problem. Build repeatability now, while it’s a process fix, rather than later, when it’s a training and cleanup project across a much bigger team.

About CloudFirst Labs

CloudFirst Labs connects the Salesforce CRM, PSA, and billing systems MSPs run every day — so closed deals flow automatically into delivery, invoices match what was sold, and leadership can finally trust the forecast. Co-founded by a former VP of Technology at a $200M MSP, we’ve lived the integration problems we solve. Book a free MSP Revenue Assessment to see where your systems are leaking margin.

Connect with John Dionne on LinkedIn for more MSP systems and revenue-operations insights, or browse more MSP Insights on the CloudFirst Labs blog.


When MSP quoting errors go out with the wrong product, the instinct is usually to look at the rep who built it. That instinct is almost always pointed in the wrong direction.

MSP quoting errors

MSP Quoting Errors are Rarely About Bad Intent

Most MSP quoting errors don’t start with carelessness. They start with a rep choosing a SKU that’s close enough, pulling in a product configuration that was current six months ago, or reusing an old quote as a starting point without checking whether the underlying product has since changed. None of this is negligence. It’s what happens when the system doesn’t tell you a product is outdated, incompatible, or missing a required dependency — so the only safeguard is whatever the rep happens to remember.

The quote still goes out. The customer may even sign it without noticing anything wrong, because from their side, it reads like a normal proposal.

What Happens After the Wrong Product Gets Quoted

The real cost of MSP quoting errors rarely shows up where the error was made. It shows up downstream. Procurement flags a mismatch when they go to order the actual product. Service delivery discovers the configuration doesn’t match what they were told to implement. Finance gets pulled in to explain why the margin on a “clean” deal doesn’t look right once the correct product and pricing are substituted in.

By the time all of that gets sorted out, you’re not just fixing one line on a quote. You’re absorbing rework hours, delaying delivery, and often eating margin to make the customer whole for a mistake they never should have seen in the first place. That’s the actual cost of a quoting error — not the SKU itself, but everything that has to happen to clean up after it.

The Two Bad Options MSPs Get Stuck Between

This is where a lot of MSPs find themselves boxed in. Spreadsheets and manually built quotes are flexible, but they put zero guardrails between a rep and the wrong configuration — there’s nothing stopping an outdated SKU from making it onto a quote. On the other end, full enterprise CPQ platforms solve this problem but bring a level of implementation complexity, licensing cost, and ongoing administration that most MSPs quoting managed services, hardware, and project work simply don’t need.

Neither option fits the actual size of the problem. MSPs don’t need enterprise-grade configuration logic. They need a guardrail.

What “Controlled” Quoting Actually Requires

Closing this gap doesn’t require reinventing your sales process. It requires four specific things: an approved product list that keeps outdated or discontinued SKUs out of reach, controlled configurations that don’t let incompatible options get combined, a repeatable quote structure so reps aren’t rebuilding logic from memory every time, and Salesforce-native visibility so operations and finance can see exactly what’s on a quote before it becomes a problem.

This is the specific middle ground AgileQuote is built for — practical guardrails for Salesforce-native MSPs, without the overhead of a full CPQ implementation.

How to Know If This Is Already Happening to You

You likely don’t need to guess whether this is a live problem. Ask your service delivery and procurement teams one question: how often in the last quarter did they have to go back to sales to clarify or correct what was actually quoted? If the honest answer is “more often than we’d like,” the fix isn’t a reminder email to the sales team. It’s removing the option for the wrong product to reach a quote in the first place.

Fast quoting is genuinely valuable — speed wins deals. But accurate quoting is what keeps the business clean after the deal is signed. Fix the process before the quote goes out, and the cleanup work downstream disappears with it.

About CloudFirst Labs

CloudFirst Labs connects the Salesforce CRM, PSA, and billing systems MSPs run every day — so closed deals flow automatically into delivery, invoices match what was sold, and leadership can finally trust the forecast. Co-founded by a former VP of Technology at a $200M MSP, we’ve lived the integration problems we solve. Book a free MSP Revenue Assessment to see where your systems are leaking margin.

Connect with John Dionne on LinkedIn for more MSP systems and revenue-operations insights, or browse more MSP Insights on the CloudFirst Labs blog.
Time Flies!

It’s that time of year again! Salesforce Winter 2025 release is starting its rollout, and like every year, it is just in time for Dreamforce. (Are you attending this year?)

Salesforce Winter Release 2025
Thank you Salesforce for letting us use this image

As always, the winter release is packed with exciting new features to enhance the already powerful Salesforce platform. Here are some of the exciting enhancements the team here at CloudFirst Labs are looking forward to!

Send Email Action Upgrades

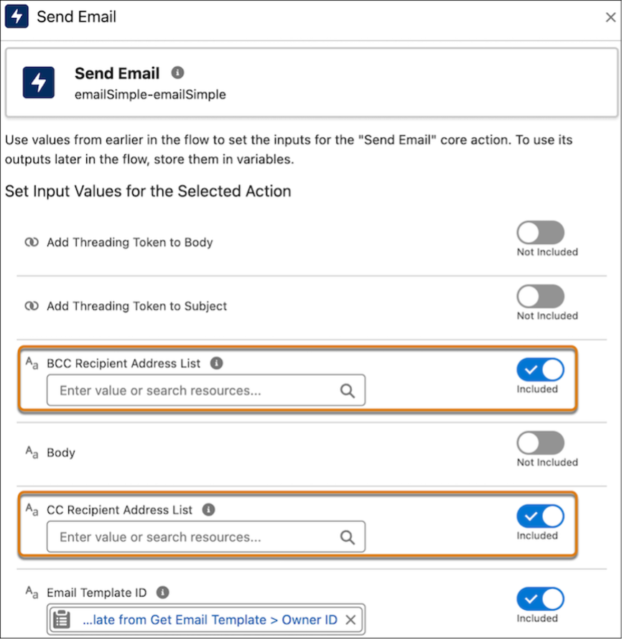
The simple Send Email component in Flow Builder is getting a major power-up! Before this release, you were limited to a maximum of 5 recipients.  That has now been bumped up to an impressive 150! Wow!

Another amazing update to the component is the ability to CC and BCC recipients. This was such a highly requested feature, Bob, our CTO, had to build a custom solution to support this. However, starting with Winter ’25, this will become a standard OOB feature. We are very excited to put this new ability to work!

Send email upgrades including BCC and CC lists

Find out more about this amazing update here.

Action Button Screen Component Becomes Generally Available

At our core, we’re committed to sticking with out-of-the-box (OOB) Salesforce solutions as much as possible, leveraging the power of standard features. We avoid beta products because we understand how much things can change between a beta and a final release.

While a popular, unofficial Salesforce site has offered ways to add a button in screen flows, it involved custom solutions—and that comes with security risks.

The great news? With this release, the action button is now generally available, providing a secure, native option within Salesforce.

So what does it do? Let’s see it in action!

Action Button Component - animated

As a #flownatic this is HUGE! I can’t wait to start enhancing solutions with the new screen component for Flow Builder.

Read more about it!

Apex Event Monitoring

While stakeholders typically focus on business optimization, admins and devlopers are always seeking ways optimize system performance. In Salesforce there are so many processes going on behind everything, it can be hard to pinpoint bottlenecks and detect the true source of issues. Not to mention the difficulty in getting an End User 360 view for auditing and adoption.

Enter Event Monitoring…

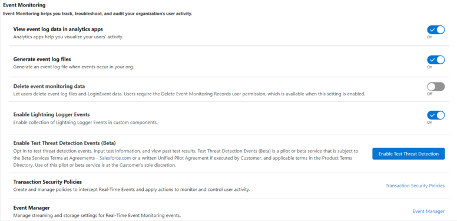
Salesforce Event Monitoring Configuration

Prior to the release, it was apart of Salesforce Shield, or could be added as a subscription. But now, with Winter ’25, ALL orgs will have access to  free-tier of Event Monitoring. Time to take your troubleshooting to the next level!
Learn more.
Control Who Can Perform Authenticated Callouts

The Winter ’25 release brings a game-changer for admins with the new external credential permissions feature. Now, admins can fine-tune which users have access to external systems, tightening security and keeping everything in check.

Now, most standard permission sets and profiles have access to the User External Credentials object by default.

With better control over who can connect where, admins can breathe a little easier knowing their data and integrations are secure and compliant with company policies. It’s a small update with a big impact on day-to-day security management.

Here’s the rundown of the update.

Dynamic Highlights Panel

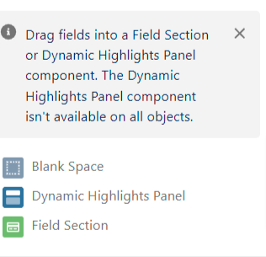
Lightning Record Pages are becoming more dynamic! Previously configured through Compact Layouts, now you can customize the Highlights Panel from the Lightning App Builder.

Image showing dynamic highlights panel data

Take note, that this feature isn’t available on all objects yet.

This feature was delivered because of votes in the idea exchange, so we know Salesforce does listen to the community.

This update will give more control over what fields users find most important.

Learn more about the Dynamic Highlights Panel here!

While new features are being added, sadly, some are being Retired

Standard-Volume Platform Events Are Being Retired

https://help.salesforce.com/s/articleView?id=release-notes.rn_messaging_standard_volume_retirement.htm&release=252&type=5


Cadence Builder Classic (1.0) is Being Retired

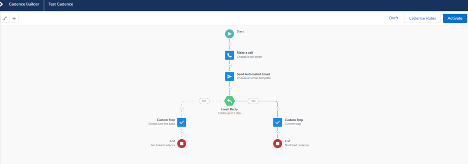
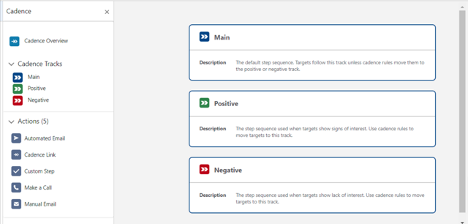
The cadences of Sales Engagement, formerly known as High Velocity Sales enables users to really take control of their sales workflows.  The Classic builder is unfortunately getting retired for the more streamlined Cadence Builder 2.0. This means less complexity, less effort, and more positive conversions!

Here’s what it looked like before:

Cadence Builder 1.0

This is the overhaul:

Image of the new Salesforce Cadence Builder

Find out more about the change here.

And if you are in need of training for the new Cadence Builder, or Cadence Conversions while getting your reps up to speed, feel free to reach out to Cloud First Labs! Our team has enabled clients with over 200 cadences to streamline their Prospect outreach.

That’s all for now!

This is just a small glimpse into what this release has to offer. Check out the full release notes for the complete rundown of all that’s coming in Winter ‘25 to Salesforce.

Don’t forget to pop in to the Release Readiness Live sessions that go over all the latest and greatest enhancements and have the opportunity to get some of your questions answered. If you’re excited to see more, you can also hit this trail for additional information on some of the highlights in the release.

Have a fun and safe Dreamforce!

Talk to the Professionals!

To learn more about our Salesforce services,  MuleSoft IDP, or MuleSoft RPA, please visit our website or fill out a Contact Us form here.

CloudFirst Labs logo


Overview – Automated Document Processing

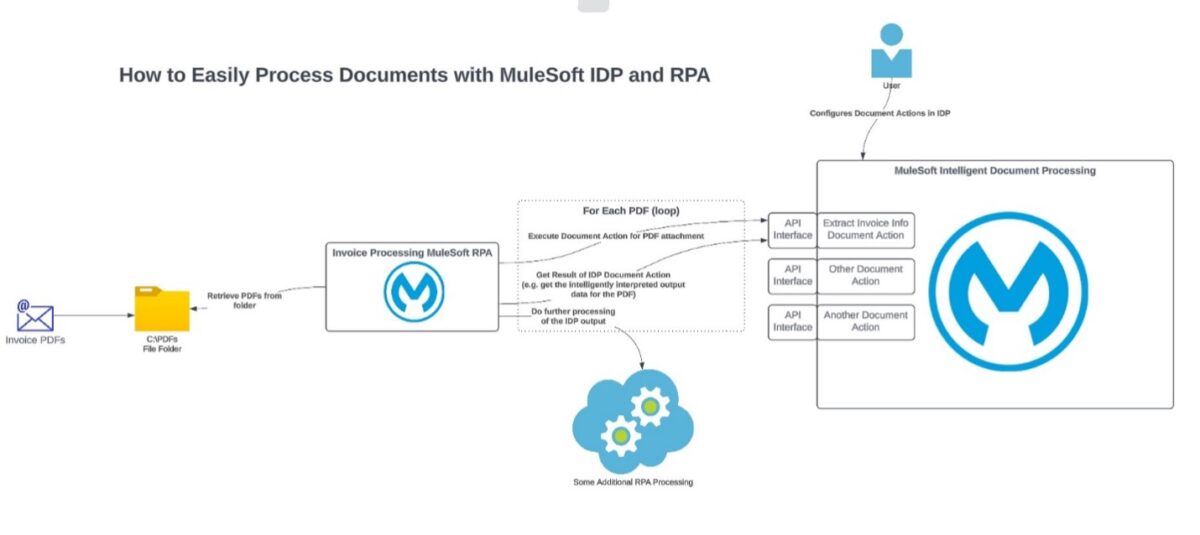
MuleSoft IDP (Intelligent Document Processing) and MuleSoft RPA (Robotic Process Automation) can be used in tandem to handle a wide variety of document processing and automation tasks. MuleSoft makes it straightforward to integrate these capabilities seamlessly into a hyperautomation solution. This article and the accompanying video will work with the following automated document processing use case: a set of invoice PDF files is placed in a folder, and the RPA process must send each document to a preconfigured IDP Document Action, get the AI-and-OCR-scraped data back from IDP, and use that data in follow-up processing tasks. (For simplicity, this use case’s only follow-up processing is displaying IDP output data on the screen). In a real-world case, the RPA process could deliver the data to a Web form, a legacy system, or do countless other processing with the data. The diagram below shows the general flow:

MuleSoft IDP and RPA process flow - big picture


Prerequisites

As prerequisites for the automated document processing, ensure that RPA Builder >= 6.6.0 is installed. Also, note that this walkthrough will not show the steps to create or configure the IDP Document Action. To see those steps (and the steps for generating a related Connected App), see our previous article “Getting Started with MuleSoft IDP” and the related video “Easily Integrate MuleSoft IDP with Your Mule API Ecosystem”.

RPA Builder Steps

The following sections contain the key steps in RPA Builder for integrating with MuleSoft IDP.

Submit Docs to IDP, Get Back Execution ID for Each

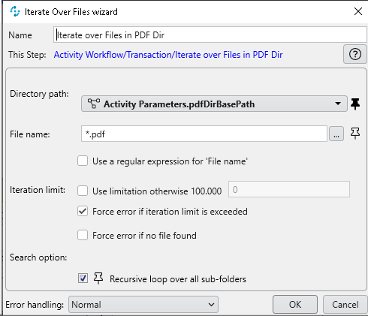
Create an activity parameter to hold the PDF directory base path (e.g. pdfDirBasePath). Create another activity parameter to hold the Connected App credentials (e.g. connectedAppCreds). Create a third activity parameter, an array, to hold execution IDs (e.g. executionIDs). Add those activity parameters into the workflow. Add an “Iterate over Files” action step and configure it to look in the PDF directory base path:

Screen showing Iterate over Files Wizard window

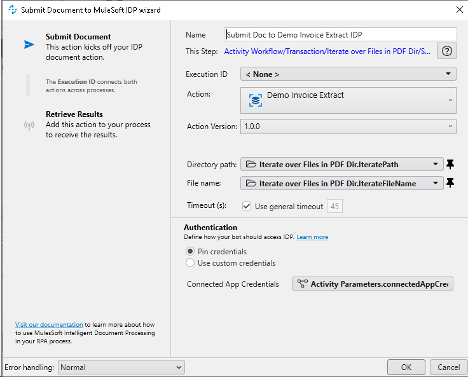
Within the File Iterator, add a “Submit Document to MuleSoft IDP” action step and configure the Action and Action Version as desired.  Pin the connectedAppCreds from the activity parameter created earlier. When running, this step is what will start the IDP processing for the provided document:

Main screen for the Submit Document to MuleSoft IDP Wizard

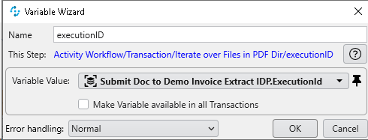
Save the ExecutionId from the IDP action step to a variable named executionID:

Screen showing the Save Variable Wizard


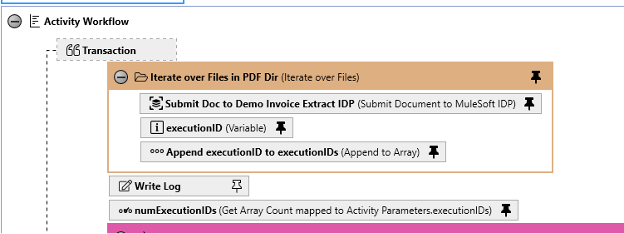
Add an “Append to Array” action step and append the executionID variable to the executionIDs array. After doing this, the Iterate over Files section should look like the screenshot below:

Add Append to Array action step

Immediately after the Iterate over Files, add a Get Array Count action step to count the number of IDs in the executionIDs array.

Loop over Execution IDs, Retrieve IDP Results for Each

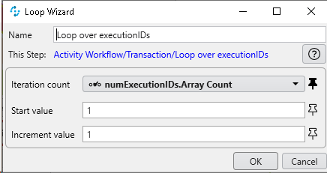
Add a Loop to loop over numExecutionIDs.Array Count:

Loop Wizard main screen

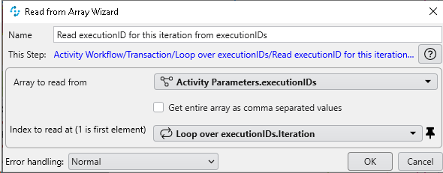
Within this Loop, add a Read from Array step to read the current iteration’s executionID from the array:

Read from Array wizard screen

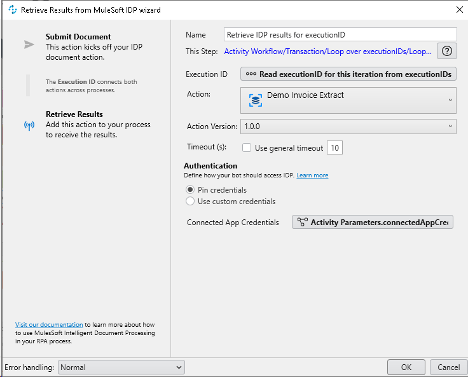
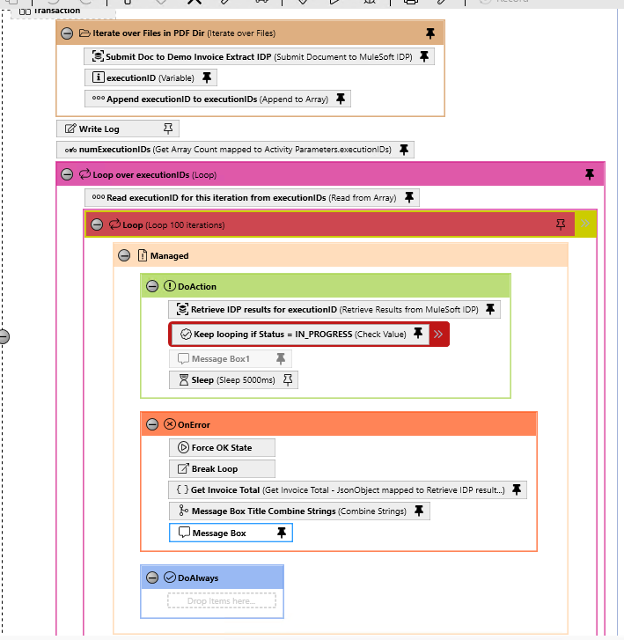
Then, within this Loop, add one more Loop. This inner loop should have a high number of iterations (e.g. 100) that we never intend to actually hit. This inner loop is used to continually check whether the IDP execution is in progress or if it is complete. Once it is complete, the inner loop will be broken and processing will move forward. To accomplish this, add a Managed block within the inner loop. In the DoAction section of the managed block, add a “Retrieve IDP Results from MuleSoft IDP” action step and configure it appropriately:

Wizard screen for Retrieve Results from Wizard process

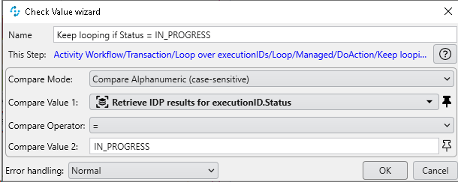
Following that, add a Check Value and have it compare the IDP result Status to IN_PROGRESS:

Check Value Wizard screen

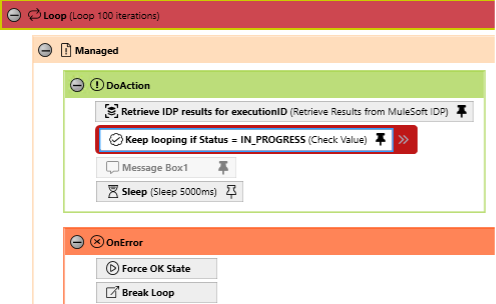
This means that the inner loop will continue if the processing is still IN_PROGRESS, but the inner loop will throw an error otherwise. So if it completes, an error will be thrown and the process will jump into the OnError section of the Managed Block. However, if it is IN_PROGRESS, the RPA should sleep for a few seconds before checking the status again:

Image of the Loop flow

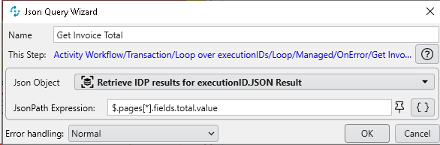
In the OnError section, add a Force OK State action step because it is not truly an error scenario when the Status changes from IN_PROGRESS (to either SUCCEEDED or MANUAL_VALIDATION_REQUIRED). After forcing the OK state, add a Break Loop action step. Also, any processing could be done with the data here. In this demonstration, the total is simply extracted using a Json Query action step:

JSON query wizard main screen

Then the total is displayed along with the full JSON content returned by IDP in a Message Box. (Again, in a real scenario, there would be additional processing executed here to deliver the data to the appropriate system(s)):

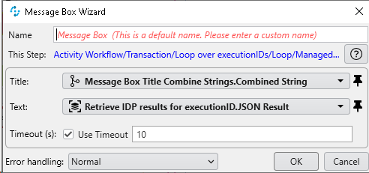
Message Box Wizard screen

With this in place, the RPA is set up to successfully display the JSON output along with the parsed total. The full RPA workflow for the automated document processing looks like this:

image of the full RPA Workflow

See it in Action

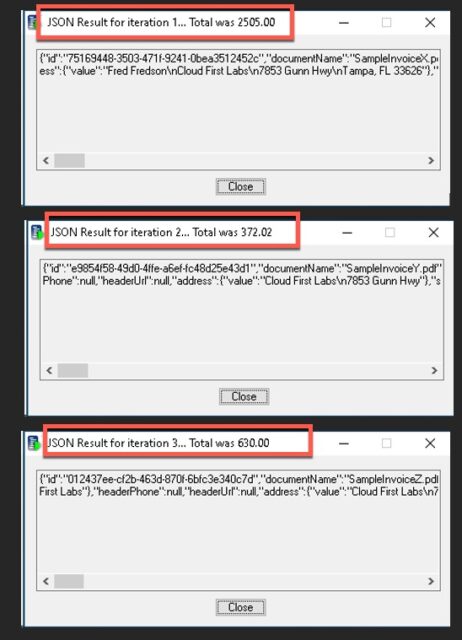
To see this in action, run the RPA workflow. As shown in the video and screenshots below, it successfully outputs both the invoice total (thanks to IDP correctly parsing it for each PDF) and the full JSON content:

JSON parsinf results

I go into some more detail and explanation in the accompanying YouTube video for this automated document processing blog entry, and encourage you to check it out:

Conclusion – Your Automated Document Processing Made Easy

Go ahead and harness the power of MuleSoft Intelligent Document Processing (IDP) and Robotic Process Automation (RPA) to streamline your automated document processing workflows. Say goodbye to the tedious manual tasks and embrace a more efficient, automated solution that’ll save you tons of time and effort.

Talk to the Professionals!

To learn more about our MuleSoft IDP, MuleSoft RPA, Partner Manager and EDI, or Salesforce services, please visit our website or fill out a Contact Us form here.
CloudFirst Labs logo

Overview – What is MuleSoft IDP?

MuleSoft IDP (Intelligent Document Processing) is a relatively new functionality that enables data retrieval from disparate document types and formats.  MuleSoft IDP allows these various documents to be handled in a streamlined, automated, and customizable fashion. For certain document types such as Invoices and Purchase Orders, MuleSoft IDP has out-of-the-box capability to scan the document and parse out dozens of relevant data points as part of a Document Action.  Document Actions can be configured to use AI prompts to extract additional data from documents. Not only is this tool powerful to use right from the user interface in Anypoint Platform, but MuleSoft has made the tool easy to integrate with as part of an API-led solution.

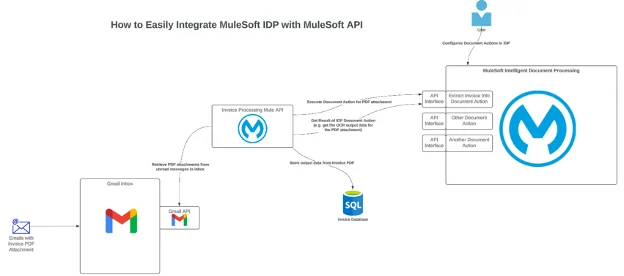
This article and accompanying video show the straightforward process for integrating an IDP Document Action into a MuleSoft-API-based orchestration. To illustrate it, this post will use the process diagrammed below, with a MuleSoft API reading PDF attachments from a Gmail inbox, sending each attachment to a “Demo Invoice Extract” IDP Document Action, and storing the resulting data found by IDP into a database. The details around this use case (e.g. Gmail inbox as source system, SQL database as target system) could easily be configured for other technologies and platforms, but ultimately shows how to properly configure a Mule application to work with MuleSoft IDP.

MuleSoft IDP Overview Diagram
MuleSoft IDP Overview – Blog Scenario

Configure Document Action in MuleSoft IDP

Configure the Action

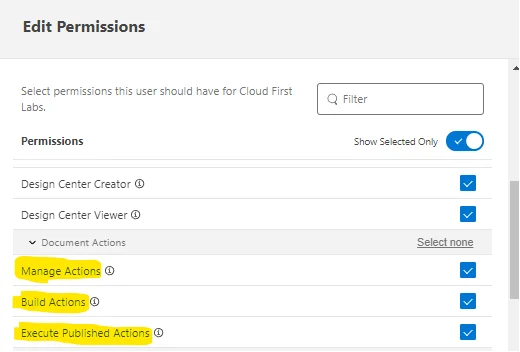
In Anypoint Platform, ensure that the organization has the entitlement to Intelligent Document Processing.  Also ensure that the relevant user has the following permissions enabled in Access Management under “Document Actions” for the relevant business group(s): Manage Actions, Build Actions, and Execute Published Actions.  A Document Action is the foundation for IDP and must exist before a document can be integrated:

Check for IDP permissions

With these permissions in place, log in to Anypoint Platform and go to Intelligent Document Processing.

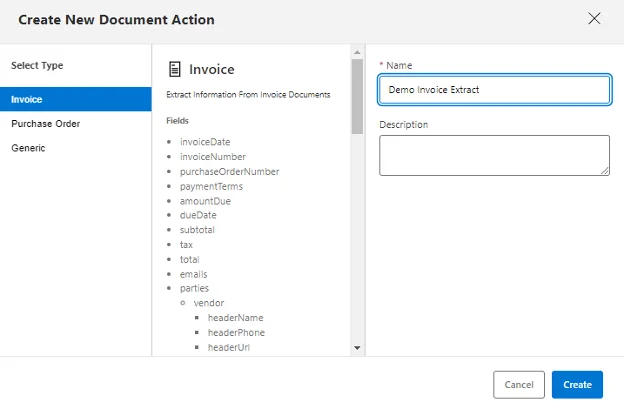
Click “Create New” to create a new action. Select Invoice and name the Document Action “Demo Invoice Extract”. Click Create:

Create New Document Action in MuleSoft

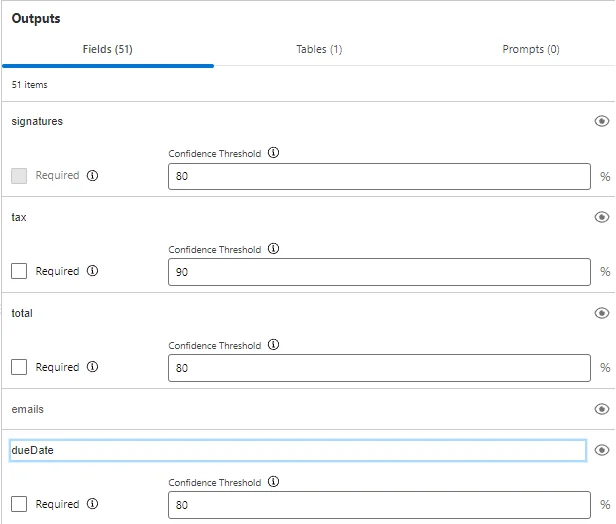
This automatically generates dozens of data fields that will be parsed by default for any provided invoice document. These fields can be configured on an individual basis to be Required (e.g. if the field cannot be extracted from a document, the document requires manual review) and the Confidence Threshold can be set (e.g. if the algorithm’s confidence score for the extracted field is below this threshold, the document requires manual review):

Invoice Default Output Field configuration

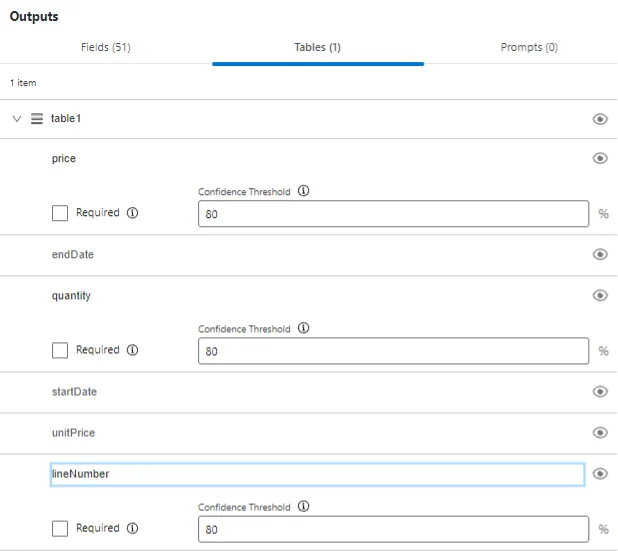
There is also a Tables section, which consists of tables of data found within such a document. For example, one invoice document can have multiple line items. Each line item could have a price, lineNumber, and a quantity, so those fields are part of a table:

Default Invoice Table outputs

Finally, there are prompts. These prompts are defined by the user. The user asks a direct question using natural language to gather more information about the document beyond what is captured out of the box:

Document Action Prompt Examples - MuleSoft IDP

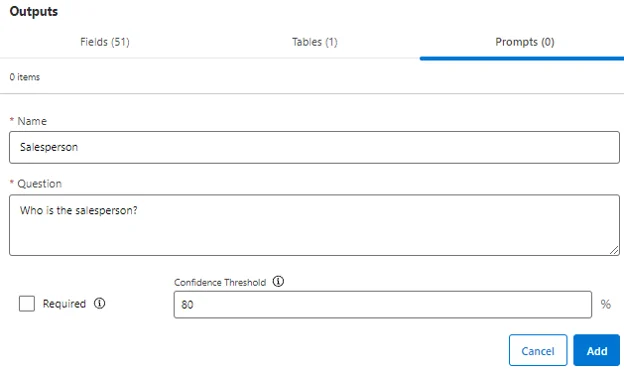
For this example, add a new Prompt with Name = “Salesperson” and Question = “Who is the salesperson?”. Leave the Confidence Threshold as the default 80%. Click Add:

Document Prompt Output screen (defaults)

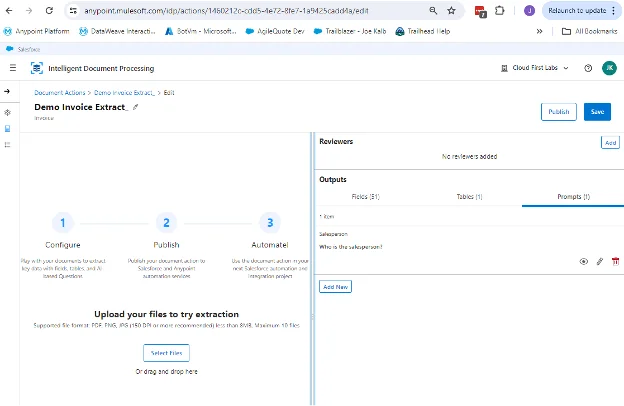
With this in place, the default Document Action is configured and ready to be tested:

Demo Invoice example main screen

Test the Action

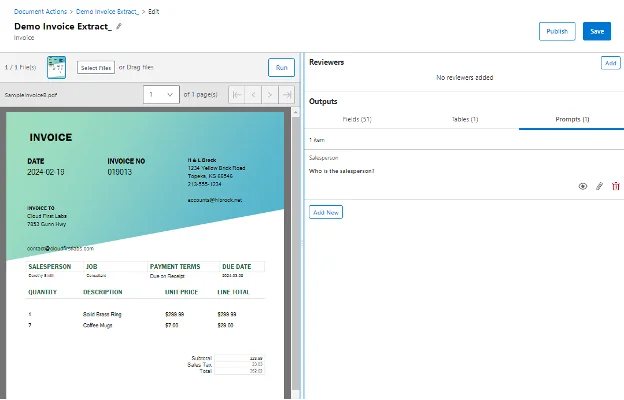
To test the action, upload one (or more) invoice files in the “Upload your files to try extraction” section of the screen. Drag a file to the screen. A preview of the file will show:

Sample Invoice to process and configure

Then click Run to run the Document Action and extract the data from the document. After the extraction process runs, it shows the outputs in the Outputs section of the screen:

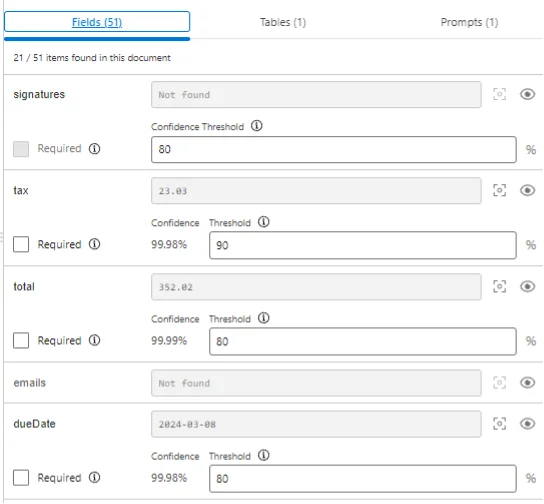
Field scanning results

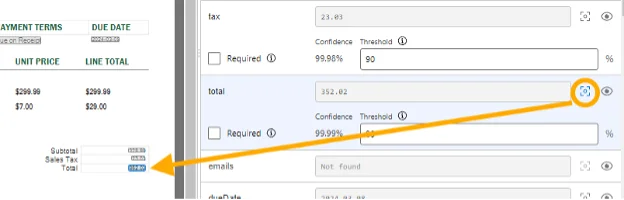
For this example, MuleSoft IDP processing (which uses AI and learns as you configure more documents), was able to automatically “match” 21 out of the 51 default fields for the Invoice document. Clicking on the icon next to the extracted value will highlight the extracted location in the parsed document:

Compare fields processed in IDP document

With this Document Action successfully parsing the data as desired, click Save.

Publish the Action to Exchange

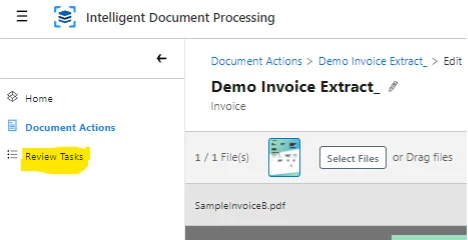
Before the action can be published, at least one Reviewer must be added to the Document Action. (If a document is scanned by a Document Action and it has extracted data with confidence scores below the Confidence Threshold, or if the extracted data is missing Required fields, the document will show up in the Reviewer user’s Review Tasks in the left-hand screen panel:

Add extra tasks to document processing

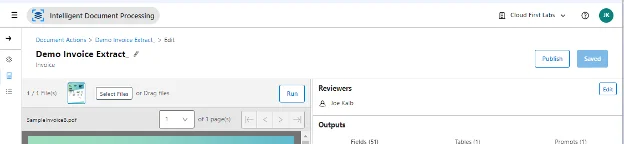
Click Add in the Reviewers section and add one or more users who will be responsible for manual review of these documents. Such users would be able to modify extracted data as they find appropriate as part of the review process:

Blank reviewer screen, click ADD to add reviewer(s)

After adding a Reviewer, the Document Action is ready to be published. Click Publish:

Publish Action in IDP

The Document Action gets published to Anypoint Exchange:

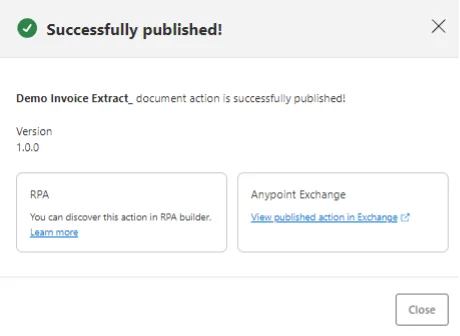
Demo is Published to Anypoint Exchange

Click the link to view the published action to see it in Exchange:

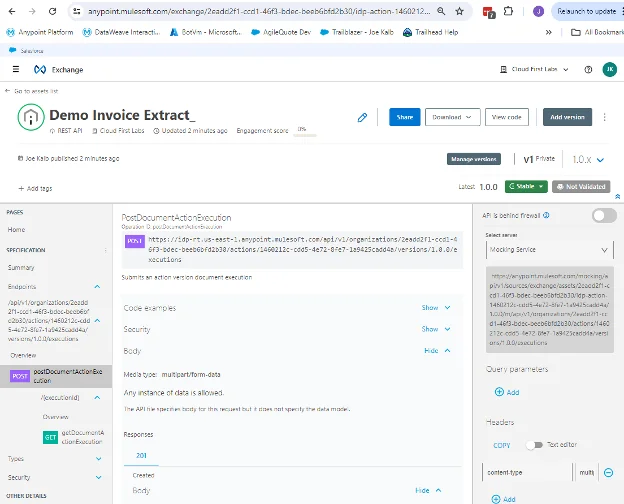
Demo Invoice Extract Exchange Main Page

Note that an API has been generated for the Document Action with two endpoints: a POST and a GET. The POST is the one where the actual document content is sent so that IDP can extract data. However, this endpoint simply acknowledges the message, providing an execution ID while the extraction process runs in the background. To check on the status of the execution, call the GET endpoint for the provided execution ID. Initially the status is likely to be IN_PROGRESS. Upon completion of the extraction, the status will move to either SUCCEEDED (if all required fields found and all confidence thresholds hit) or MANUAL_VALIDATION_REQUIRED. Along with those statuses, all the extracted data will be provided in JSON format.

For calling this Document Action’s API from a MuleSoft application, make sure to grab the host name from Exchange (e.g. idp-rt.us-east-1.anypoint.mulesoft.com in the Exchange screenshot above). This will get configured into the Mule app later.

Additionally, to call this API, a Connected App must be created with access to call the API.

Create Connected App for Calling IDP APIs

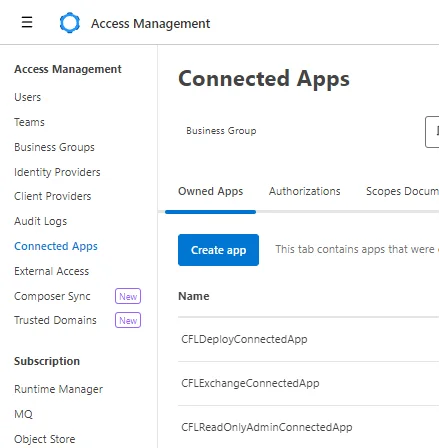
To create the required Connected App, go to Access Management. Click Connected Apps in the left-hand panel. Click Create app:

Create a Connected App screen

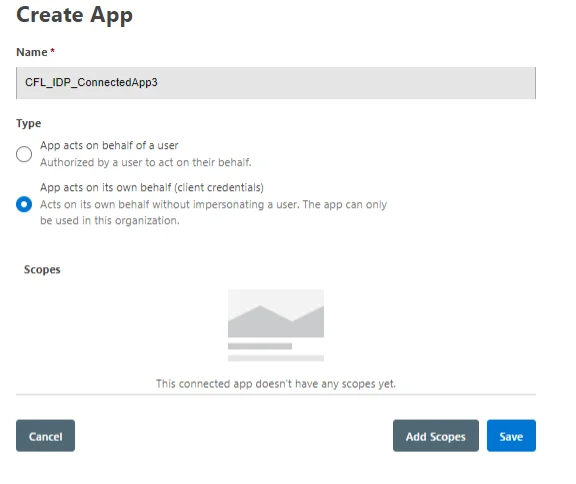
Give the app a name (e.g. “CFL_IDP_Connected_App3”) and set Type = “App acts on its own behalf (client credentials)”. Then click Add Scopes:

Create App

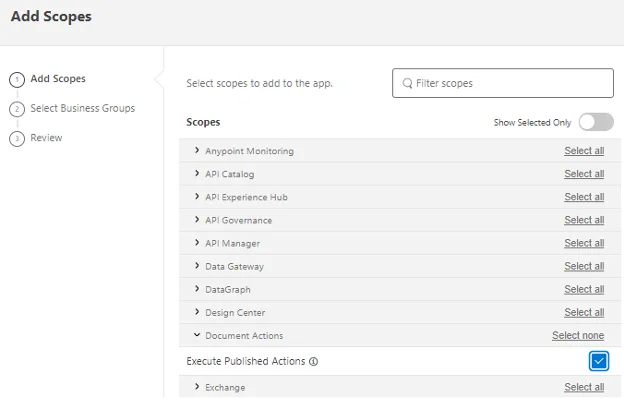
For Scopes, add “Execute Published Actions” under Document Actions:

Add App Scope

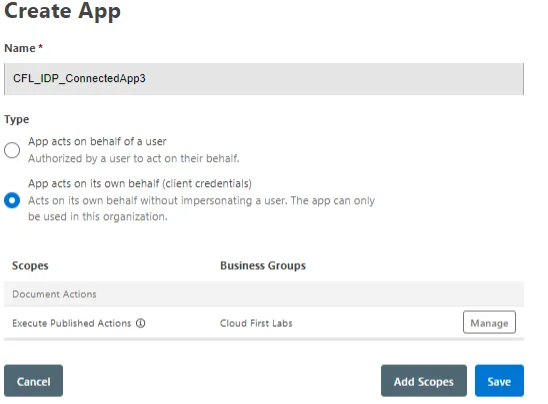
Click Next and add it to the relevant Business Group(s) and click Next again. Confirm the choices by clicking Add Scopes. Then click Save:

Finish App Creation

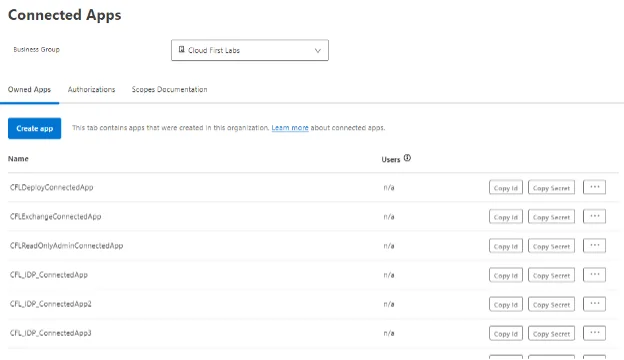
After saving, the Connected App will show up in the list. Gather the Client ID by clicking Copy Id and gather the Client Secret by clicking Copy Secret. These ID and Secret values will be configured into the calling Mule application because the Mule app will use these Connected App credentials to get an OAuth 2.0 token used to authenticate against this Document Action’s API:

Connected App List

Create Mule App to Call IDP API

Get Attachments from Email Inbox

As shown in the architecture diagram in the Overview section, this Mule application is going to get content from Gmail to provide to the IDP Document Action’s API. The Mule app uses the Gmail connector to find unread messages with PDF attachments in a specific email inbox. All found PDF attachments are then sent to the Document Action API for IDP processing.

This article does not go into detail on how to use the MuleSoft Gmail connector, but we put together a previous article and video detailing how to integrate a Mule API with Gmail using the Gmail connector. Check out that link to get more details.

Download the Document Action Connector from Exchange

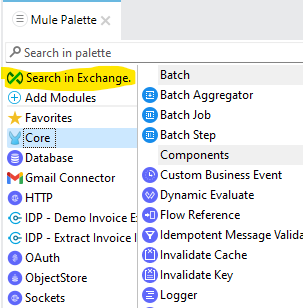
To integrate with the configured IDP Document Action, double-click Search in Exchange in the Mule Palette:

Search the MuleSoft Exchange

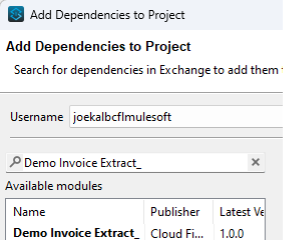
In the popup window, enter the name of the published Document Action to search for it:

Search for Demo Invoice Extract

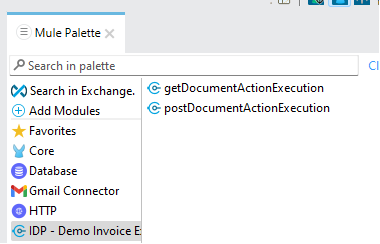
Click it and click Add to move it to the Selected modules. Then click Finish. It should now show up in the Mule Palette and have two components available to choose from: getDocumentActionExecution and postDocumentActionExecution

Available Components

Configure the Document Action Connector

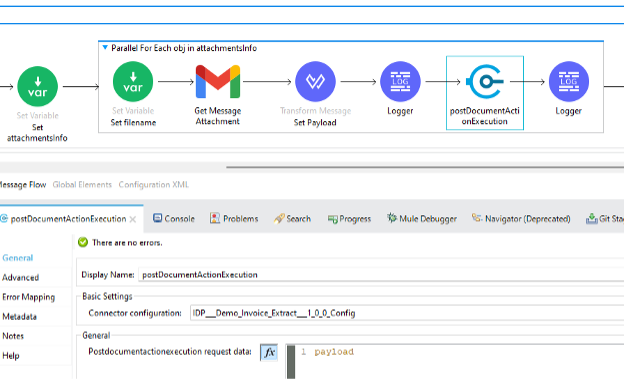
The use case requires both the postDocumentActionExecution (POSTing the document content to IDP) and the getDocumentActionExecution (GETting the IDP extraction results). In the Mule app, after getting the attachment, drag the postDocumentActionExecution component into the Mule flow:

Mule App configure PostDocumentActionExecution

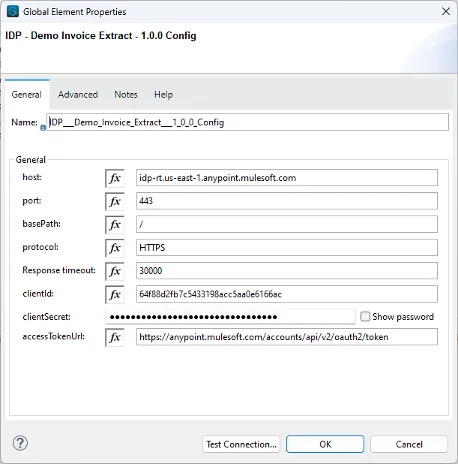
Add (or edit, if it already exists) a Connector configuration. (The following fields should of course be controlled by property values, but for simplicity’s sake for this demo example, the screenshots show hard-coded values.) Add the host value that was noted a few sections ago from the URL in Anypoint Exchange for the Document Action’s API (e.g. idp-rt.us-east-1.anypoint.mulesoft.com). Set port = 443. Set basePath = /. Set protocol = HTTPS. Set Response timeout to 30000 (or whatever is desired). For clientId, paste the Client ID copied out of Access Management earlier for the Connected App. For clientSecret, paste the Client Secret copied out of the same screen. Leave the accessTokenURL as the default (https://anypoint.mulesoft.com/accounts/api/v2/oauth2/token):

Set Global Element Properties

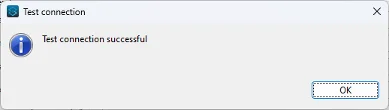
Click Test Connection… it should test successfully:

Test the Connection

With this, the Connector configuration is complete and will be reused by both the “post” and “get” connector components.

Configure the Payload for POST Request to IDP API

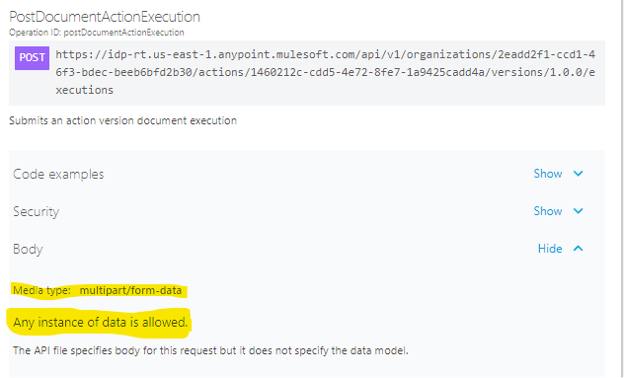
A screenshot above showed the Postdocumentactionexecution request data equalling “payload”. It is very important to note what this payload should consist of, especially because it is a little bit unclear from the Exchange documentation. As shown here, the Exchange documentation says that “Any instance of data is allowed” and that it is multipart form data:

Configure POST Document Payload

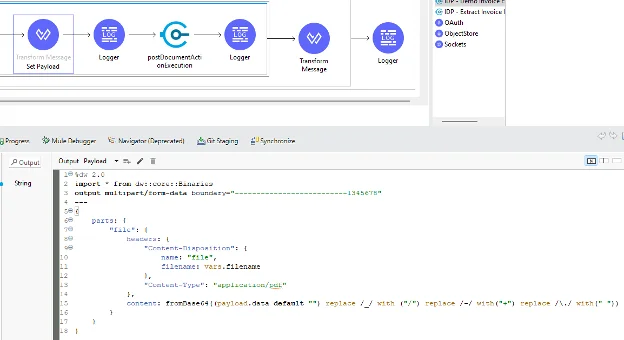
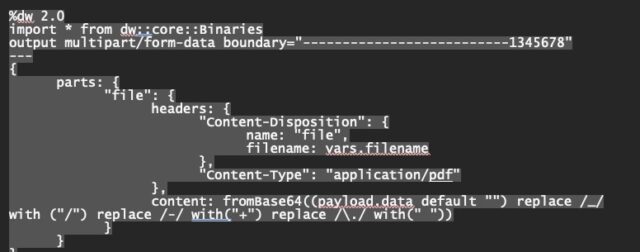
In reality, the payload must match certain specifications. The multipart form data must have a part named “file” which holds the content, and that content should be in binary format. In the example shown here, the PDF content comes back base64-encoded from the Gmail connector in a field on a JSON payload called “data”.  And the base64-encoding used by Gmail uses some different characters from what the DataWeave fromBase64 function is expecting. For that reason, there are a few “replace” commands attached in the DataWeave shown here. (The article that led to inclusion of this is here; it was found as part of troubleshooting an “illegal base64 character 2d” error.) Anyway, here is a screenshot of the Set Payload Dataweave component:

Dataweave "replace" commands

And here is the DataWeave content:

Dateweave code

The key points are:

  • The request data should use multipart/form-data
  • The content should go inside the parts element with a part named “file”
  • The content’s filename should be passed under file -> headers -> Content-Disposition -> filename.
  • The content should be in binary format as opposed to being sent as a base64-encoded string.

This flow is now set up to send the correct data to the IDP Document Action API for data extraction.

Configure the Execution ID for GET Request to IDP API

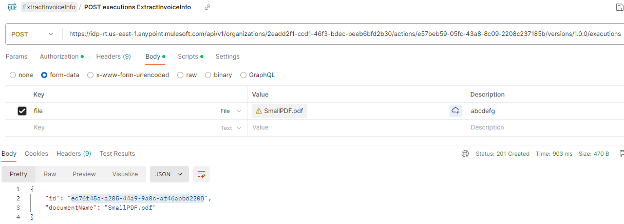
The postDocumentActionExecution receives back a JSON payload with the id (e.g. ec76f45a-a205-44a9-9a0c-af46abbd2208) and documentName (e.g. SmallPDF.pdf), as shown in a direct Postman call below:

Configure the Execution ID

Save this id field somewhere so that it can be used for the follow-up GET call(s) to get the actual IDP-extracted data.

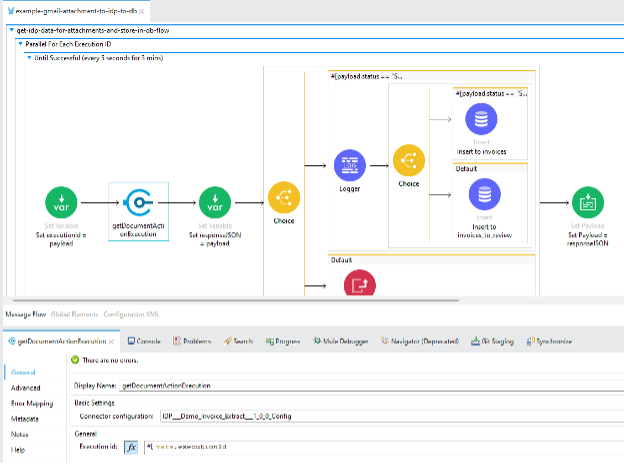
The configuration for the follow-up GET call is very simple; just provide the execution ID as an input:

Configure the Follow Up GET call

This will successfully enable the Mule app to call to get the extracted data. However, as shown in both the video and the screenshot above, there is an Until Successful scope in place for this action. This is because there is no “Do While” loop in MuleSoft but “Until Successful” can serve a similar need. In this case, the app continues calling the getDocumentActionExecution until the background processing is complete. (In other words, it checks every 5 seconds to see if the returned status is IN_PROGRESS or if it is SUCCEEDED or MANUAL_VALIDATION_REQUIRED.)

Handle the IDP Output JSON Data

Once the processing is complete and the status is either SUCCEEDED or MANUAL_VALIDATION_REQUIRED, the response data from getDcumentActionExecution will contain the IDP output JSON data. This JSON data is the extracted data from the passed-in document content. As shown in the screenshot above, this simple app is just storing extraced data in database tables. But this data could be passed on to any relevant systems thanks to the power and easy integration ability provided by MuleSoft. Below is an example of IDP Output JSON data:

{

    "id": "e315f963-553a-4e07-9bc8-742d99d04629",

    "documentName": "SampleInvoiceC.pdf",

    "status": "SUCCEEDED",

    "pages": [

        {

            "page": 1,

            "fields": {

                "invoiceDate": {

                    "value": "02/25/2024"

                },

                "invoiceNumber": {

                    "value": "971"

                },

                "purchaseOrderNumber": null,

                "paymentTerms": {

                    "value": "Due on receipt"

                },

                "amountDue": null,

                "dueDate": {

                    "value": "03/01/2024"

                },

                "subtotal": {

                    "value": "400.00"

                },

                "tax": {

                    "value": "20.00"

                },

                "total": {

                    "value": "420.00"

                },

                "signatures": null,

                "emails": null,

                "parties": {

                    "vendor": {

                        "headerAddress": {

                            "value": "CREATE & CO. 123 MAIN ST. I SEATTLE, WA 78910"

                        },

                        "headerName": {

                            "value": "CREATE & CO."

                        },

                        "headerPhone": {

                            "value": "111-222-3333"

                        },

                        "headerUrl": null,

                        "address": {

                            "value": "CREATE & CO. 123 MAIN ST. I SEATTLE, WA 78910"

                        },

                        "street": {

                            "value": "123 MAIN ST."

                        },

                        "city": {

                            "value": "SEATTLE,"

                        },

                        "state": {

                            "value": "WA"

                        },

                        "zipCode": {

                            "value": "78910"

                        },

                        "country": null,

                        "name": {

                            "value": "CREATE & CO."

                        },

                        "addressBlock": {

                            "value": "123 MAIN ST. I SEATTLE, WA 78910"

                        }

                    },

                    "buyer": {

                        "headerAddress": {

                            "value": "Cloud First Labs\n7853 Gunn Hwy\nTampa, FL 33626"

                        },

                        "headerName": {

                            "value": "Cloud First Labs"

                        },

                        "headerPhone": null,

                        "headerUrl": null,

                        "address": {

                            "value": "Cloud First Labs\n7853 Gunn Hwy\nTampa, FL 33626"

                        },

                        "street": {

                            "value": "7853 Gunn Hwy"

                        },

                        "city": {

                            "value": "Tampa,"

                        },

                        "state": {

                            "value": "FL"

                        },

                        "zipCode": {

                            "value": "33626"

                        },

                        "country": null,

                        "name": {

                            "value": "Cloud First Labs"

                        },

                        "addressBlock": {

                            "value": "7853 Gunn Hwy\nTampa, FL 33626"

                        }

                    }

                }

            },

            "tables": {

                "table1": [

                    {

                        "unitPrice": {

                            "value": "15.00"

                        },

                        "quantity": {

                            "value": "10"

                        },

                        "unitOfMeasure": {

                            "value": null

                        },

                        "price": {

                            "value": "150.00"

                        },

                        "description": {

                            "value": "20\" X 30\" hanging frames"

                        }

                    },

                    {

                        "unitPrice": {

                            "value": "5.00"

                        },

                        "quantity": {

                            "value": "50"

                        },

                        "unitOfMeasure": {

                            "value": null

                        },

                        "price": {

                            "value": "250.00"

                        },

                        "description": {

                            "value": "5\" X 7\" standing frames"

                        }

                    }

                ]

            },

            "prompts": {

                "Salesperson": {

                    "prompt": "Who is the salesperson?",

                    "source": "document",

                    "answer": {

                        "value": "Oscar Ward"

                    }

                }

            }

        }

    ]

}

***See the video for how this output was handled and what the resulting database content looked like for a set of 3 disparate invoice documents.

Check out the video for this blog to see how easy document processing can be, as well as other tips, tricks and nuggets regarding MuleSoft IDP”

Conclusion

MuleSoft IDP enables quick and strong data extraction capabilities with straightforward configuration. This intelligence, using out-of-the-box functionality and the ability to leverage AI to glean further insights, can be easily plugged into many MuleSoft API-based solutions, or other technology such as Salesforce Flow. With some simple configurations, MuleSoft can set up organizations for success in a wide variety of automation, document processing, and integration use cases.

Talk to the Professionals!

To learn more about our MuleSoft IDP, MuleSoft RPA, Partner Manager and EDI, or Salesforce services, please visit our website or fill out a Contact Us form here.

CloudFirst Labs logo

Overview – You aren’t stuck using the MuleSoft Sharepoint Connector

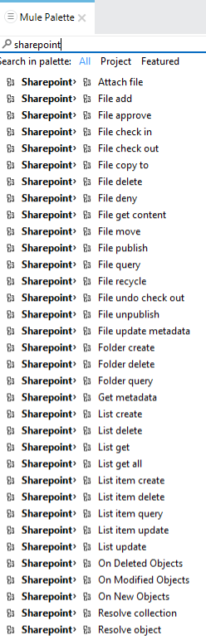
It is important to note that MuleSoft provides numerous other ways to integrate with Sharepoint; this post shows only one example. For example, if an organization has an Anypoint Platform subscription, a MuleSoft application can be used to easily monitor and/or integrate with Sharepoint using the handy and robust MuleSoft Sharepoint Connector. This connector has dozens of operations available to handle these needs.

But that’s easy, and we wanted to show the full functionality of MuleSoft and RPA processes that can be used to handle a wide variety of use cases and can be triggered from all sorts of common applications, and in this case, a MuleSoft RPA process that is triggered from Sharepoint by the creation or upload of a new file in a specific folder in Sharepoint.

MuleSoft Sharepoint Connector object list

If you’re a Sharepoint and MuleSoft shop, follow along with this post and see how an organization can be enabled to automate activities based on Sharepoint files and Power Automate, connecting to MuleSoft RPA without even needing to utilize the rest of the MuleSoft Anypoint Platform.

Set up Automation in Sharepoint

Create a New Power Automate Flow

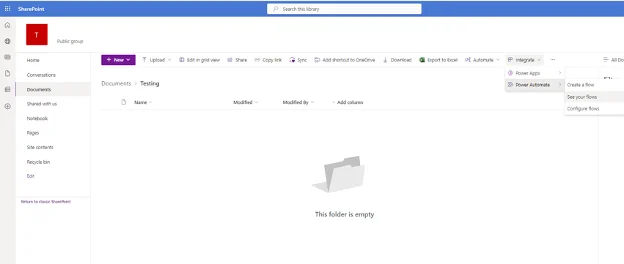
Within Sharepoint, go to Integrate -> Power Automate -> See your flows :

Power Automate Flow Summary Screen

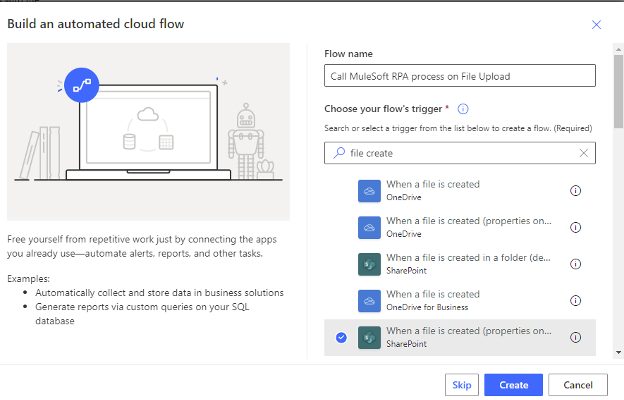
From there, click New flow -> Automated cloud flow.

Our use case will be named ‘Call MuleSoft RPA process on File Upload’ and the trigger will be ‘Sharepoint – When a file is created (properties only)’.

Click Create:

Power Automate Create Flow - give it a name

Create Trigger Action

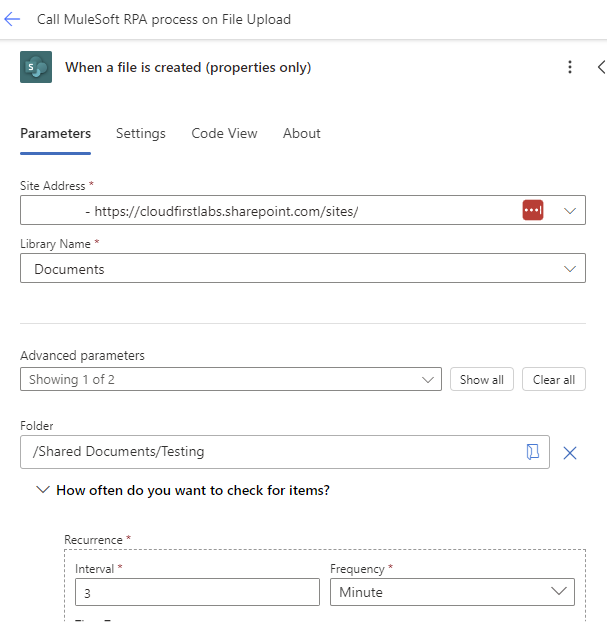
Click the auto-generated action step and set the Site Address and Library Name as desired. Under Advanced parameters, set a Folder name (e.g. /Shared Documents/Testing). By default, Power Automate will check for new files every 3 minutes:

Power Automate - set Flow parsameters

Create HTTP Action for OAuth Call

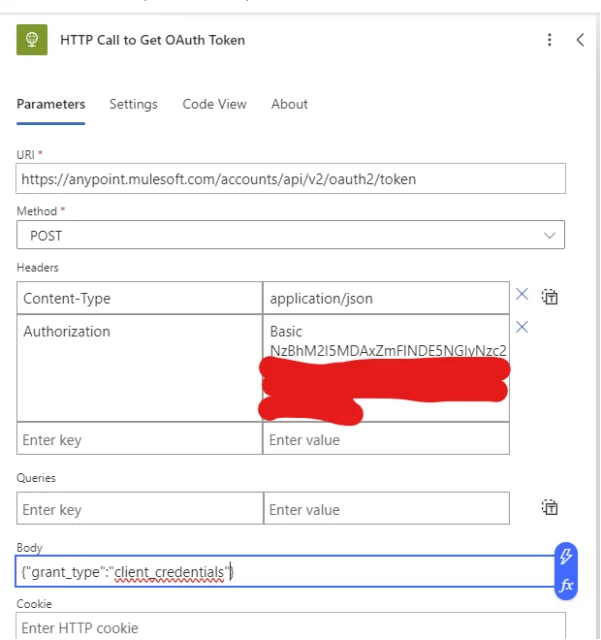
Add a new action underneath the trigger of type HTTP. This will be used to make an HTTP request to get an OAuth access token used to authenticate and authorize the call to the RPA API. For URI, set https://anypoint.mulesoft.com/accounts/api/v2/oauth2/token. For method, do POST. For Headers, add one for Content-Type = application/json. And add one more for Authorization = Basic <base64-encoded client_id:client_secret value>.

For Body, set a simple JSON payload of: {“grant_type”:”client_credentials”}:

Power Automate - Get OAuth Token

Create Parse JSON Action for Getting OAuth Token from Response

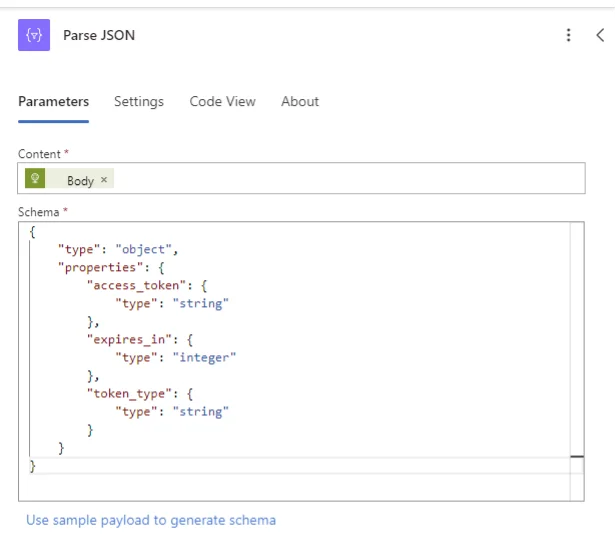
Add a new Action underneath the OAuth HTTP call. The Type should be “Parse JSON”. This is needed to be able to use the access_token from the previous HTTP step in the upcoming HTTP step for authentication.

Set Content = Body from the prior “HTTP Call to Get OAuth Token” step.

And for schema, use the “Use sample payload to generate schema” link and paste a sample payload into it to generate the appropriate JSON schema:

Power Automate Parse JSON screen

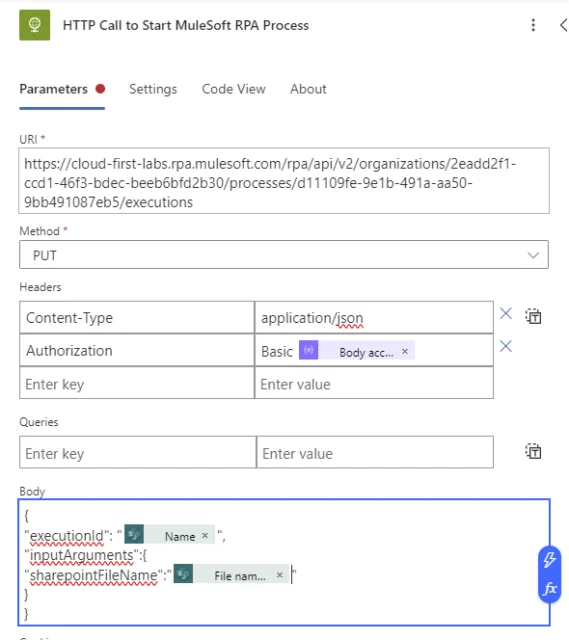
Create HTTP Action for RPA API Call

Finally, a step is needed to make the actual HTTP call to the MuleSoft RPA API URL. Get the URL from Anypoint Exchange after publishing the RPA process as an invokable run configuration in Production phase.

Set URI = <URL from Exchange>

Set Method = PUT

Create 2 headers. One should be Content-Type = application/json. The other should be Authorization = <“Basic ” + <Parse JSON – Body access_token>>

For Body, set executionId = <whatever ID is desired for identifying the RPA process execution> (in this case, Name from the trigger step is used). Then set any inputArguments as required. In this case, sharepointFileName is set equal to the “File name with extension” from the trigger step:

Power Automate - set HHHTP call parameters

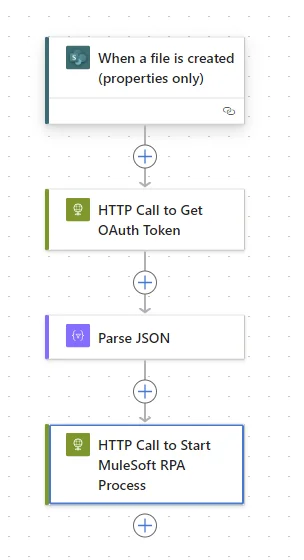
With this in place, the overall Power Automate flow should look like this and it can be saved:

Power Automate screen showing all steps

Upon saving, it can be tested. Alternatively, a file can be dropped in the configured location and the flow will trigger, calling the MuleSoft RPA.

See it in Action

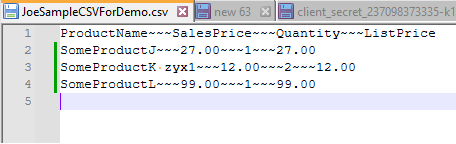
After uploading the screenshotted CSV file to that Sharepoint location, the RPA process was kicked off. It ran successfully, updating another application with the data from that CSV:

Our test CSV file

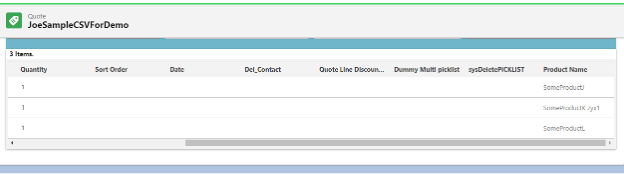
Our test CSV file in Salesforce


This is how easy it is to trigger a MuleSoft RPA process from Sharepoint instead of using the MuleSoft Sharepoint Connector! Part 2 of this post will contain the details on setting up the actual RPA process used here.  For a guided tour of getting this set up, check out my YouTube video:

Talk to the Professionals!

To learn more about our MuleSoft RPA, MuleSoft and EDI, or Salesforce services, please visit our website or fill out a Contact Us form here.

CloudFirst Labs logo