Overview
We know that RPA processes are excellent for automating screen work. However, with MuleSoft RPA, they can be used to consume OAuth-Secured APIs and use data from the response! In this blog, I will show how to build a MuleSoft RPA process that successfully gets and uses data from an API that is secured in Anypoint Platform by OAuth 2.0. [Note: This approach works whether the OAuth-secured API is built in MuleSoft or another technology.]
The key steps here are:
- Know the URL and credential details needed to get a valid OAuth token. (Assumed to be set up as a prerequisite)
- Know the URL and payload details needed to get a valid response from the actual API. (Assumed to be set up as a prerequisite)
- In MuleSoft RPA Builder, add activity parameters for the values mentioned in (1) and (2)
- In RPA Builder, add a REST Call for the OAuth token request.
- In RPA Builder, add a JSON Query action step to parse the access_token from the response.
- In RPA Builder, add a REST Call for the actual API request (and reference the parsed access_token).
- In RPA Builder, use JSON Query action steps to parse the relevant data from the API response.
Primer on OAuth 2.0 and OAuth-Secured API
APIs secured by OAuth 2.0 require a valid access token to be sent as authentication and authorization, usually as an HTTP header. The OAuth 2.0 provider has a URL endpoint that provides a token when a requestor sends a valid request to the URL (with appropriate Client ID, Client Secret, grant_type, and scope details). The token is usually valid to be reused for some arbitrary amount of time, such as one hour. But if no token is already cached, the token can be used as part of a two-step process for calling an API:
- Call OAuth Token endpoint with valid information to get back a valid access token.
- Put the token returned in (1) into an HTTP header and send a request with that header and appropriate payload to the actual API.
This two-step process is what will be used in this walkthrough.
Add REST Call Step for 2 REST Calls in RPA Builder
[Note: the following steps assume the OAuth and API details for your use case are set up and known in advance.]
In RPA Builder, create activity parameters for the following fields.
- apiURL (alphanumeric Variable for the actual API URL to call)
- oauthTokenURL (alphanumeric Variable for the OAuth Token URL to call to get access token)
- oauthClientCredentials (User Account Variable for the Client ID and Secret for getting token)
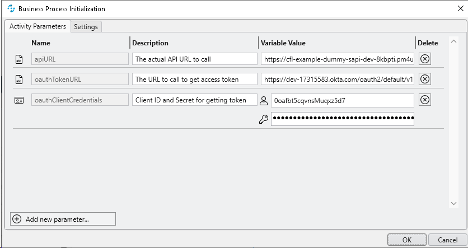
Map those activity parameters to your workflow.
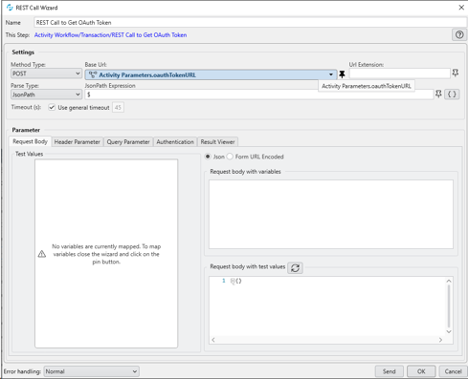
Add a REST Call Step for Getting OAuth Token
Then, add a REST Call from the Toolbox for the OAuth Token call. Set it up as a POST request with no payload body. Map the oauthTokenURL as the Base Url.
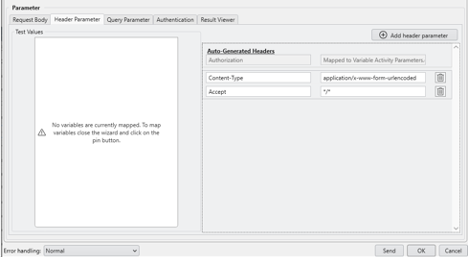
Then go to the Header Parameter tab and the following headers:
Content-Type = application/x-www-form-urlencoded
Accept = */*
Then go to the Query Parameter tab and map the following parameters:
grant_type = client_credentials
scope = myscope1 myscope2 (Your use case may differ; these are example scopes I set up for my example API)

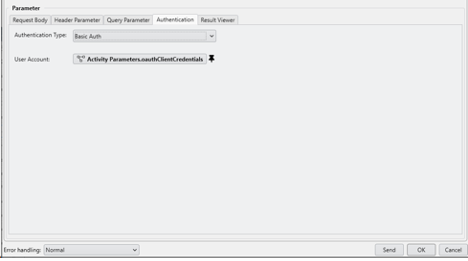
Finally, go to the Authentication tab. Select Authentication Type = Basic Auth and map your oauthClientCredentials activity parameter to the User Account field. Click OK.
Add JSON Query Step to Parse access_token
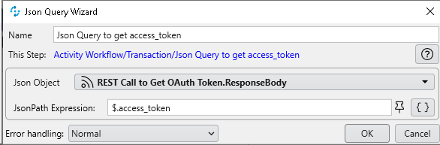
Following this step, add a JSON Query action step from the Toolbox.

Configure the Json Object as the REST Call’s Response Body, and use a JSONPath Expression of $.access_token to parse out the token value.
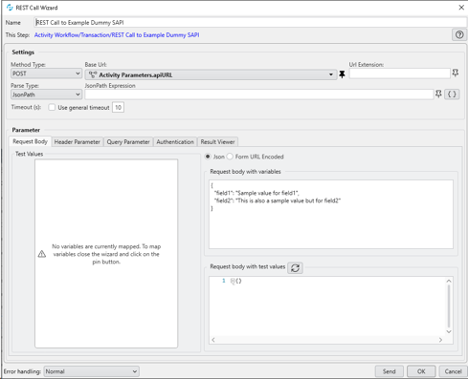
Add REST Call Step to Call Actual API
Now that the access_token has been generated and parsed, create a REST Call step to call the actual API.
![]()
Map the apiURL activity parameter to the Base Url field. The rest of the details on the Settings and Request Body tab are dependent on the specific API being called.
On the Authentication tab, set the Authentication Type as Bearer Token and map the Json Query FirstItem to the BearerToken field.
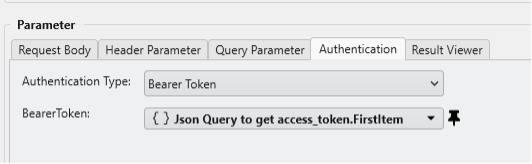
Click OK.
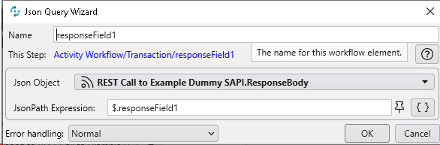
Use JSON Query Step(s) to Parse Relevant Values from API Response
Like the section above used a JSON Query step to parse the access_token value, JSON Query steps are also used to parse relevant values from the actual API response (assuming the API uses JSON). See the screenshots below to see how values were parsed from an example API.

Now you are able to capture the response! While many steps, we have shown the power of using the above approach way to utilize API-based data inside a MuleSoft RPA process. This is only one example of the limitless use cases that exist for this technology, and clearly shows how a customer can maximize their automation environment to do more than just screen work. Check out the accompanying YouTube video on our channel:
Talk to the Professionals!
To learn more about our MuleSoft RPA or Salesforce services, please visit our website or fill out a Contact Us form here.